Getting Started: Software Setup
12 Chapter 1
Transferring Files to Thomson Lyra AV Jukebox
You can transfer files to your Thomson Lyra AV Jukebox via MusicMatch Jukebox or Windows Explorer.
Connect your Thomson Lyra AV Jukebox if isn’t already connected to your computer using the provided USB cable as
previously illustrated.
Note: Don’t disconnect the USB cable during music download. Doing so may corrupt system files or the
files being downloaded. It is highly recommended that the Thomson Lyra AV Jukebox be connected to
the ROOT USB PORT (the main USB port) on the PC or a self powered USB hub.
Transfer Files Via MusicMatch Jukebox
1. Start the MusicMatch Jukebox software. Drag and drop the desired tracks from the Music Library to the Playlist
display.
2. From the menu area, select Files/Send to Portable Device to display the Portable Device Manager
screen. Under the Attached Portable Devices option, select Lyra Personal Audio Player.
Note: If more than one Thomson Lyra AV Jukebox is connected to your computer,
select the corresponding Lyra Personal Audio Player displayed in the drive you
want to transfer content to.
3. Select the playlist item and drag it to the Lyra Personal Audio Player. The songs in the playlist are
transferred to your Thomson Lyra AV Jukebox.
Note: If your Thomson Lyra AV Jukebox doesn’t appear in the Portable Device
Manager area, click the REFRESH button.
When the transfer is finished, the Thomson Lyra AV Jukebox Profiler application automatically runs
so it can sort/profile the newly transferred audio files.
Caution: Make sure all data are transferred to the Thomson Lyra AV Jukebox before
unplugging the USB cable.
In Windows 2000/XP, you must stop the device before unplugging it. Click the
icon (the Unplug or Eject hardware icon) from the system tray and select the USB
Mass Storage device for the drive associated with the Thomson Lyra AV Jukebox,
and click STOP. See the Windows Help for details about the Unplug or Eject
Hardware topic.
In Windows 98SE/Me, click the icon and follow the same instructions as above.
Transfer Files Via Windows Explorer (Drag and Drop)
If your Thomson Lyra AV Jukebox isn’t already connected to your computer, connect it using the provided USB cable.
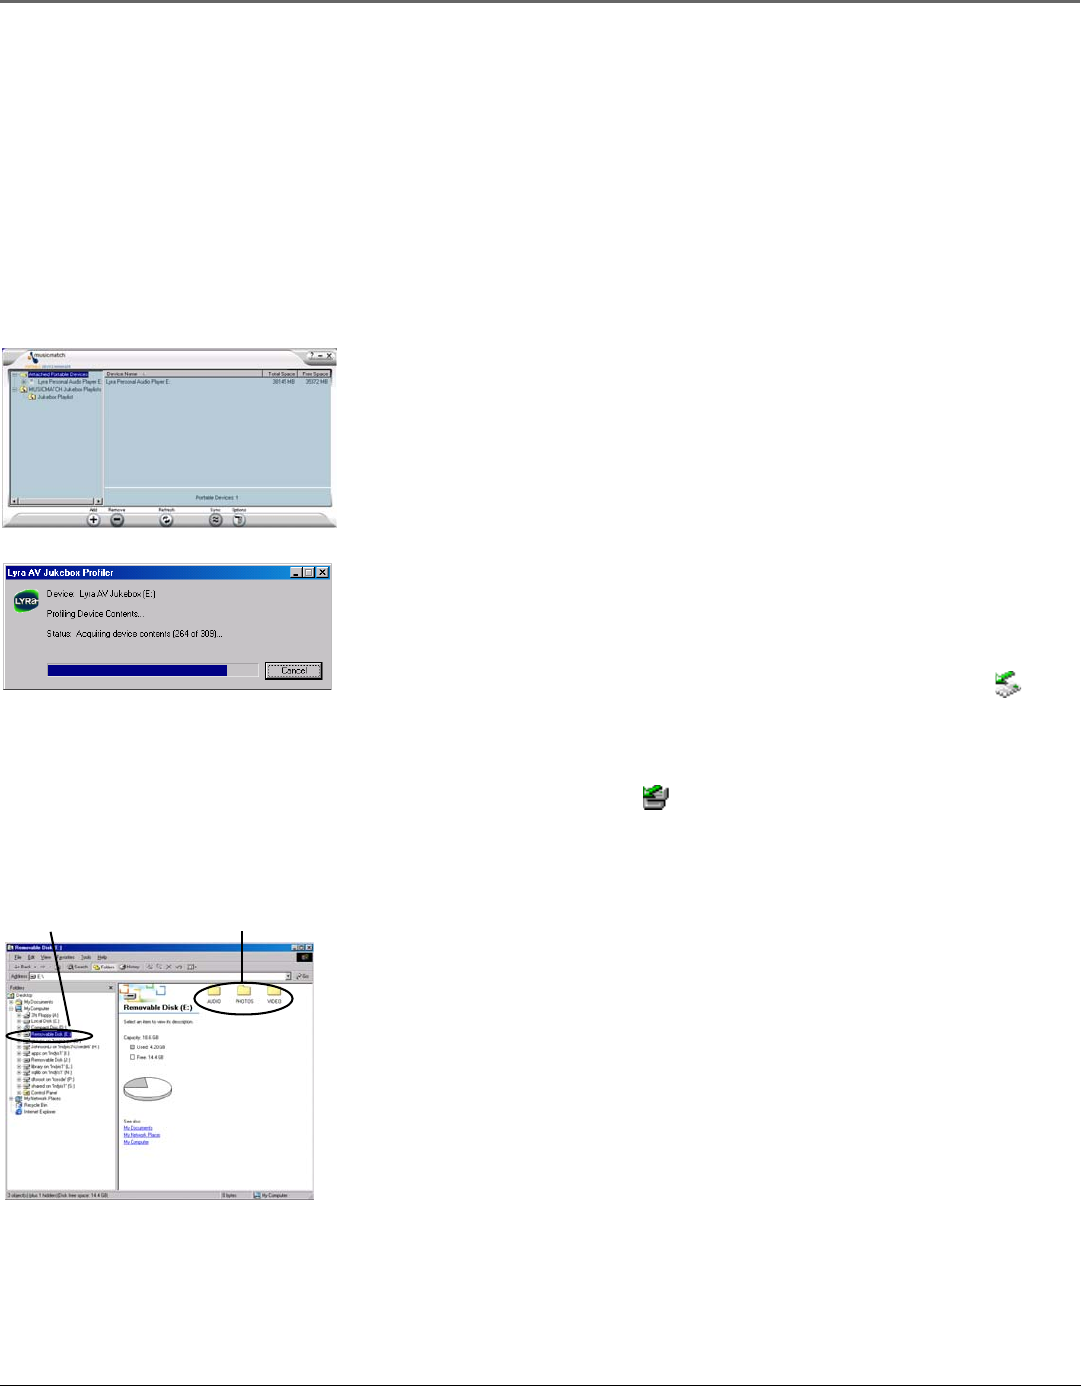
From Windows Explorer, open the Thomson Lyra AV Jukebox drive. Open the drive where the files/
folders you want to transfer are located, and highlight them. Drag the files/folders to the associated
folder on the Thomson Lyra AV Jukebox drive.
Supported multimedia files should be stored in the following folder structure off of the root of the
hard drive to ensure the files will be properly recognized by the device:
Audio Content-it is highly recommended that all supported audio files (mp3 or mp3PRO) be
stored in the AUDIO system folder to allow for easy navigation and organization of the contents
of the Thomson Lyra AV Jukebox.
Photo Content- supported photo files (JPEG or JPG) must be stored in the PHOTOS system
folder in order to be available for viewing on the device. Sub-folders may be created under the
PHOTOS system folder for easy navigation and organization of your image files.
Video Content- supported video files (MPEG4 in avi file format) must be stored in the VIDEO
system folder in order to be available for playback on the device. Sub-folders may be created
under the VIDEO system folder for easy navigation and organization of your video content.
Thomson Lyra AV
Jukebox hard drive
AUDIO, VIDEO, and
PHOTOS folders


