


4
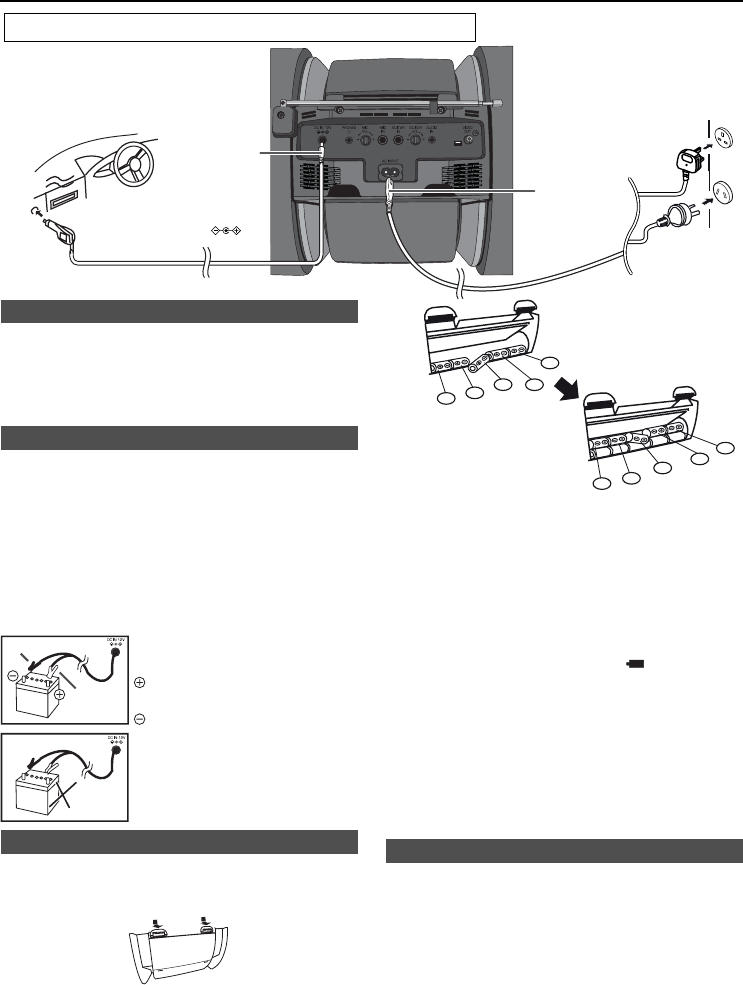
System connections
AC power connection
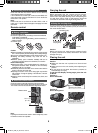
After checking all the connections have been made correctly, plug
the AC power lead of this unit into the wall socket.
Notes:
z Remove all batteries when using AC power.
z Unplug the AC power lead from the wall socket if the unit will not
be in use for a prolonged period of time.
DC power connection
Caution:
z During battery/DC operation, the unit will be set to Demo mode
off with display and subwoofer light in MODE 2 to reduce the
battery power consumption.
z When using battery/DC power, the remote control cannot be
used to turn on the unit.
z Unplug the AC power lead from the unit before using the DC
power. Otherwise the unit will not work.
z Use only a car adaptor with DC 12V output voltage.
z Insert the plugs fi rmly.
z When the unit is not in use for an extended period, remove the
car adaptor from the car supply socket.
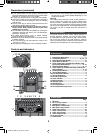
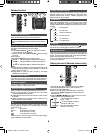
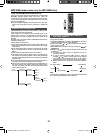
12V
24V
Black
Red
Attention: connection of DC lead and
battery terminals.
: Connect the red battery clip to (+) on
the battery terminal.
: Connect the black battery clip to (–)
on the battery terminal.
DC power can only be used for a 12V
battery.
Do not use any battery besides a 12V.
Operation with batteries
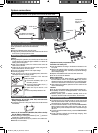
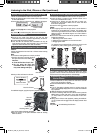
1 Disconnect the AC and DC power lead, and remove the
battery compartment cover.
z Connection of the AC or DC power lead to the unit disconnects
the batteries.
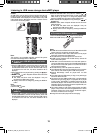
2 Insert 10 „D” size batteries (UM/SUM-1, R20, HP-2 or similar)
into the battery compartment.
z When inserting or removing the batteries 5 and 0, push them
towards the (-) battery terminals.
z
Installing the batteries incorrectly may cause the unit to malfunction.
z Batteries are not included.
6
7
9
8
10
1
2
5
4
3
3 Replace the battery compartment cover.
Precautions for battery use:
z Insert the batteries according to the direction indicated on the
rear panel.
z Remove the batteries if they are weak or if the unit will not be
used for long periods of time. This will prevent potential damage
due to battery leakage.
z Replace all old batteries with new ones at the same time.
z Do not mix old and new batteries.
Battery replacement:
z When batteries are low, battery indicator “
” will blink to show
that the batteries need to be replaced. sound may become
distorted and unit may automatically turn off or mute during high
volume level. Reduce the volume level or replace the batteries.
z When replacing the batteries, place the unit on a cushion or soft
cloth to avoid damage.
Cautions:
z Do not use rechargeable battery (nickel-cadmium battery, etc.).
z Immediately remove the discharged batteries. If the chemical
leak into the unit, clean it.
z Batteries (battery pack or batteries installed) shall not be
exposed to excessive heat such as sunshine, fi re or the like.
Demonstration mode
z The fi rst time the unit is plugged in with AC power, the unit will
enter the demonstration mode. You will see words scroll and the
subwoofer light up will operate in the fl ashing mode.
z To cancel the demonstration mode, press the DEMO/DIMMER
button (remote control) during power stand-by mode. The unit
will enter the low power consumption mode. The subwoofer light
will be off.
z To return to the demonstration mode, press the DEMO/DIMMER
button again.
z If iPod or iPhone is docked, the unit will begin charging. “iPod
CHARGING” will be displayed.
Do not connect the DC or AC power to the unit at the same time.
To DC IN 12 V
socket
Car adaptor (not supplied)
Socket: DC 12 V 4.5 A
To AC INPUT
socket
Wall socket
AC 110 - 240 V ~
50/60 Hz
GX-M10H_OM_UK_SCA.indd Sek1:4GX-M10H_OM_UK_SCA.indd Sek1:4 2012-08-17 00:07:432012-08-17 00:07:43