


KH 6777
• so-called “YUV“ signals (half frame)
and as
• so-called “YPbPr“ signals (full frame/Progressive Scan).
➧
For this subject please refer to Chapter 19 “Glossary/
Index”.
Please note:
For both methods of connection the television to
which the DVD Player is to be connected must have
two unassigned audio chinch sockets.
The cabling for both methods is identical; YpbPr sig-
nals for Progressive Scan can only be used if the televi-
sion (or the video projector) that is to be connected
to the DVD Player is Progressive Scan capable.
If you are not sure whether or not the television ( or
video projector) that is to be connected to the DVD
Player is Progressive Scan capable and has chinch
sockets, then please refer to the operating instruc-
tions for the given television (or video projector).
Both variants – and “YPbPr“ and “YUV“– require the fol-
lowing …
• the supplied audio/video chinch cable
• two additional chinch cables; these are available from
your local dealer.
To connect the DVD Player via component signal …
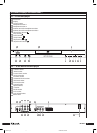
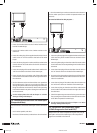
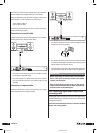
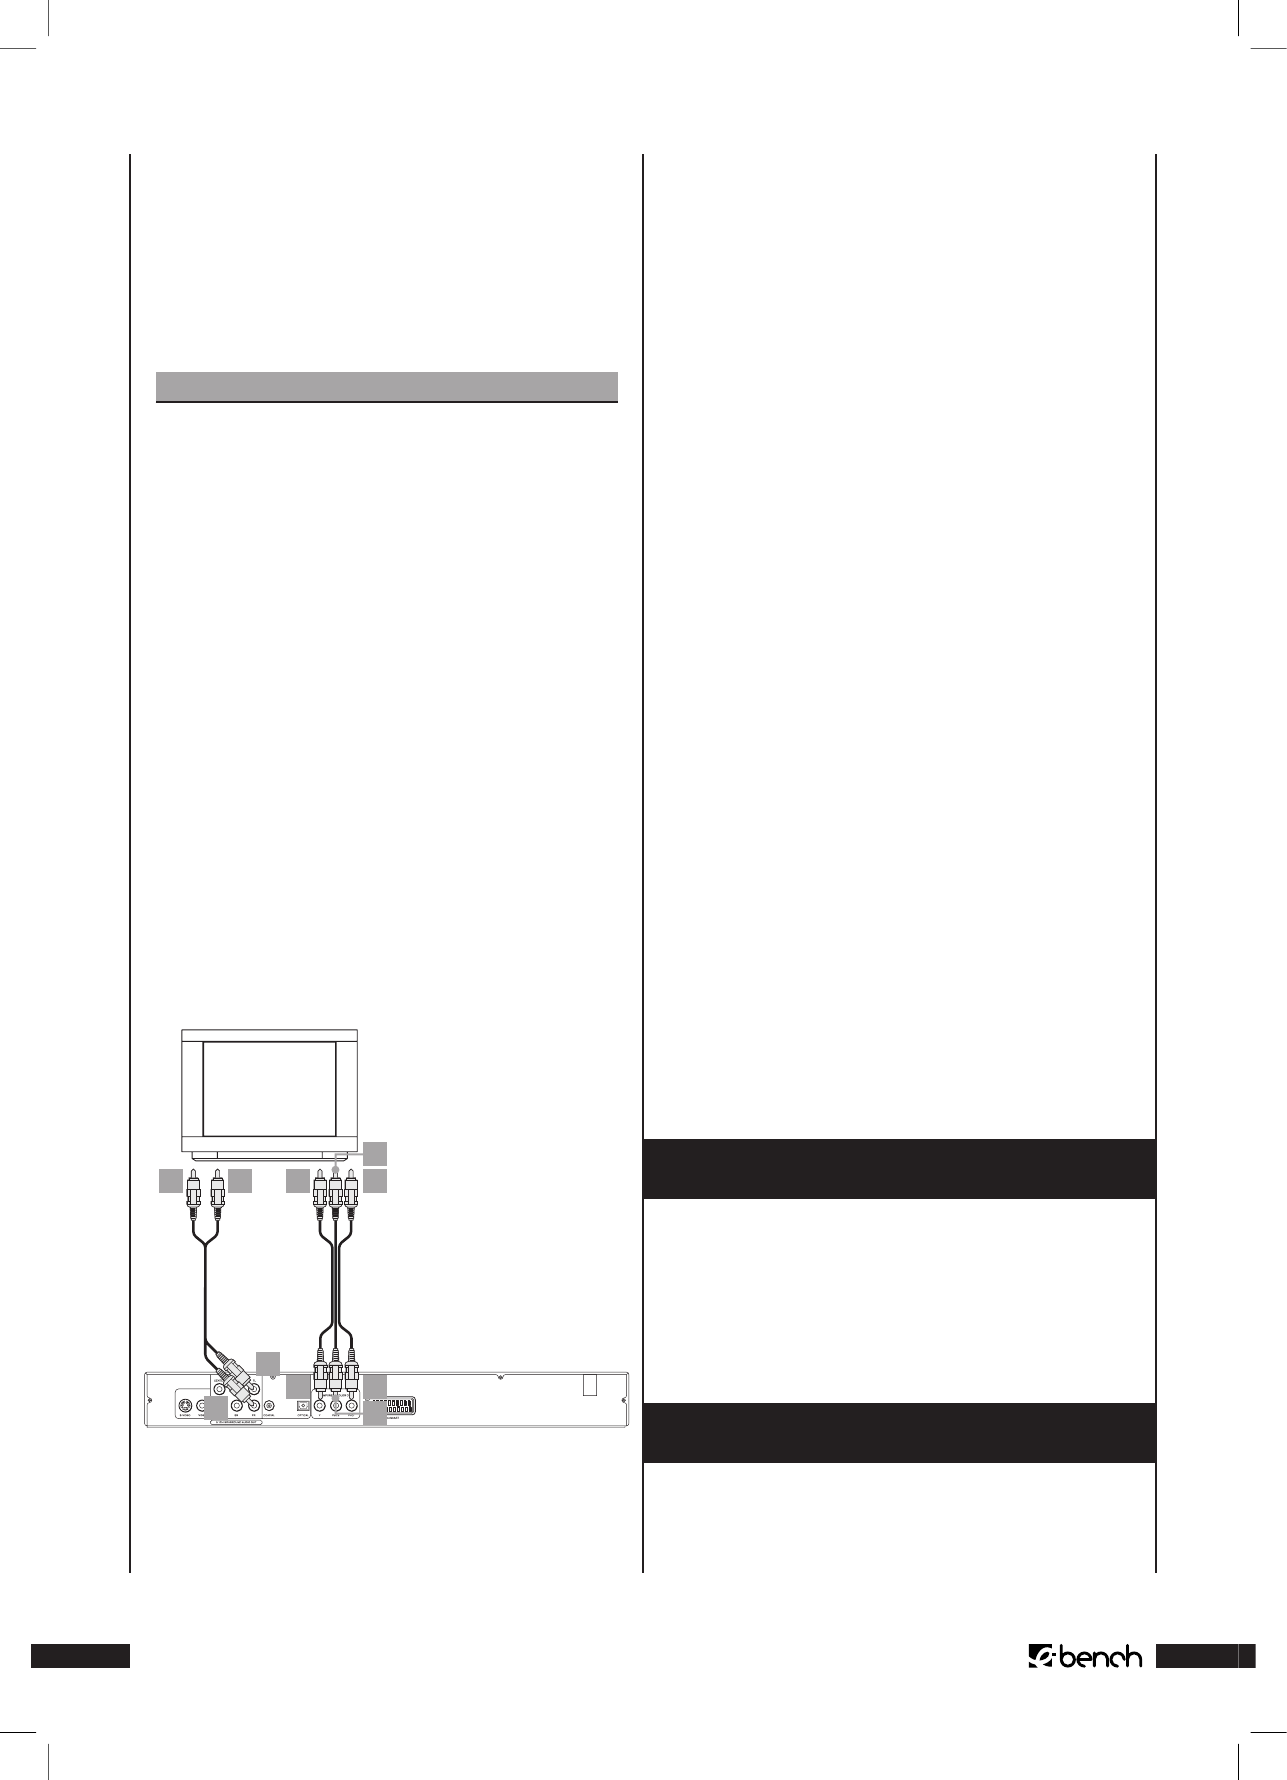
10 8 6 2
4
7
9
5
3
1
1 At the back of the DVD Player there are three so-called
“Component Colour Out“ sockets “Y“, “Pb/Cb“ and “Pr/
Cr“. First insert the red plug of the supplied audio/video
chinch cable in the “Pr/Cr” chinch socket at the back of
the DVD Player.
2 Insert the red plug at the other end of the audio/video
chinch cable in the corresponding Component Video IN-
socket “Pr/Cr” on the television.
3 Insert the white plug of the audio/video cable in the
“Pb/Cb” chinch socket at the back of the DVD Player.
4 Insert the white plug at the other end of the audio/video
chinch cable in the corresponding Component Video IN-
socket “Pb/Cb” on the television.
5 Insert the yellow plug of the audio/video chinch cable in
the “Y” chinch socket at the back of the DVD Player.
6 Insert the yellow plug of the audio/video chinch cable
in the corresponding Component Video IN-socket “Y” on
the television.
7 Pick up the two additional chinch cables and insert the
the white plug of the chinch cable in the “FL” chinch socket
on the back of the DVD Player.
8 Then insert the white plug on the other end of the chinch
cable in the audio socket for the left channel on the tel-
evision.
9 Insert the red plug of the chinch cable in the “FR” chinch
socket on the back of the DVD Player.
10 Finally, insert the red plug on the other end of the chinch
cable in the audio socket for the right channel on the
television.
11 Refer to the operating instructions for the given televi-
sion to nd out whether any settings have to be made
on the television so that the DVD Player can be used in
this connection with the television.
➧
For this subject please also refer to Chapter 11.3.“Video
Settings: Setting the Video Output”.
8. Connecting the DVD Player to a Video
Projector
A video projector can be connected to the DVD Player so that
DVDs and S-VCDs can be shown by the video projector.
Refer to the operating instructions for the video projector to
nd out which connecting facilities should be used and how
the connection can be established. Any additional cables that
may be necessary are available from your local dealer.
9. Connecting headphones to the DVD
Player
Proceed as follows to connect headphones to the DVD
Player …
IB_KH6777_EN 23.09.2003, 0:56 Uhr12