


Connecting to System
ida FS 250, Operator's Guide
-19-
If the printout format does not match the test printout in Appendix B. or if
nothing was printed, this means that the printer setup does not match the
protocol converter setup. Contact your systems support personnel or your
i-data dealer.
6. Power OFF and ON the ida FS 250 and check that all indicators light up
momentarily.
7. Proceed to the chapter: Connecting ida FS 250 to System.
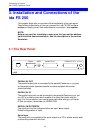
3.5. Connecting the ida FS 250 to System
After a successful test printout has been generated to establish that the
connection between the ida FS 250 converter and the printer is working
correctly (see previous section), you are now ready to connect the ida FS
250 to the system.
WARNING:
All connections to the ida FS 250 protocol converter
should be made while the power is switched OFF.
1. Turn off the power and connect the ida FS 250 to your host system
using the twinax cable, and the auto-terminating T-cable.
2. When the connection has been made, tu rn power ON and check that
the CU and READY indicators turn ON. When they do, you have
completed the installation procedure and are ready to operate the
protocol converter as described below.
What if the CU Indicator fails to turn on?
If the CU indicator does not turn ON, this means that there is no
communication with the control unit. You should check the follow ing:
a. The twinax cable connection from the control unit to the ida FS 250.
b. The control unit (is it powered up etc.)
c. Is the control unit supported by the ida FS 250 ?
(See the section. Supported Control Units, for a list of supported control
units).