


Auto LUN XP user guide for the XP12000/XP10000 33
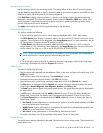
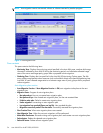
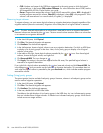
7. In the tree, double-click a parity or external volume group. A list of logical volumes in that group
appears. Logical volumes that can be migrated are indicated by the icon.
8. From a volume with the icon, click the source volume (logical volume to migrate), and click the S
button. The selected volume is defined as the source volume.
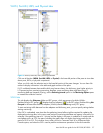
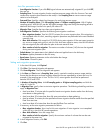
9. In the tree, double-click the parity group to which you want to migrate the source volume. A list of
logical volumes in that parity group appears. Click the target (destination) volume. You can click only
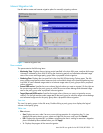
volumes with a green pin icon or an icon framed by a blue line.
10. From the logical volumes indicated by a blue icon with a left-pointing arrow, select the logical volume
to define as the target volume, and click the T button below the Target (Reserved) LDEV section.
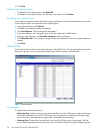
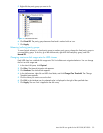
Auto LUN XP calculates estimated usage rates of the source and target parity group. Estimated results
are displayed on the right of the Source LDEV and Target (Reserved) LDEV text box and in the graph.
11. Check the estimated results in Source LDEV, Target (Reserved) LDEV, and the graph. If you think you can
achieve the necessary disk performance, go to the next step. If not, change the source or target volume.
12. Click Set.
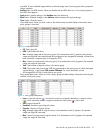
A new migration plan, consisting of the specified source and target volumes, is added to the table. The
new migration plan is shown in blue.
To migrate more than one volume manually, repeat the steps to add migration plans.
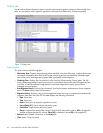
13. Click Apply.
Migration plans are applied to the disk array and wait for execution. Auto LUN XP performs multiple
migration plans concurrently. The font color of the migration plans changes from blue to black.
When a logical volume starts migration, the % column displays the migration’s progress. When
migration is complete, the volume’s migration plan disappears.
If an error occurs during migration, an error code appears.
Deleting manual migration plans
To delete a migration plan, click a migration plan, and click Delete.
You cannot use the Delete button to delete migration plans executed by programs other than Auto LUN XP.
If you select a migration plan in black (migration plan waiting for execution or being executed) and click
Delete, the character D is displayed in the DEL column. The migration plan will not be deleted until you
click Apply.
CAUTION: If you delete a migration plan that is being executed, the integrity of data on the target volume
cannot be guaranteed.
When an error condition exists on the disk array, resource usage can increase or become unbalanced. Do
not use the usage statistics collected during an error condition as the basis for planning migration
operations.
Auto Migration tab
Use this tab to make settings for automating volume migrations.