


English
280-8180-00
DXZ958RMC 41
Sound Adjustment
●Adjustment items
FRONT-L (Front left) ➜ CENTER*
1
➜
FRONT-R (Front right) ➜ SURROUND-R
(Surround right) ➜ SURROUND-L
(Surround left) ➜ SUB-WOOFER*
2
➜
FRONT-L...
*
1
“CENTER” is displayed only when
“CENTER-SP” (page 48) is set to “ON”.
*
2
“SUB-WOOFER” is displayed only when
“SUB-WOOFER” (page 48) is set to “ON”.
4. Touch
on the right of the display to
adjust to the gain level.
•“SP-GAIN” can be adjusted within the
range -10dB to +10dB.
5. Repeat steps from 3 to 4 to adjust the
desired item.
6. Press the [SOUND] button to return to the
original mode.
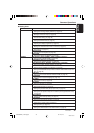
Adjusting the filter frequency
Filter frequency
You can set a filter frequency value best suited
for your speakers.
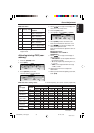
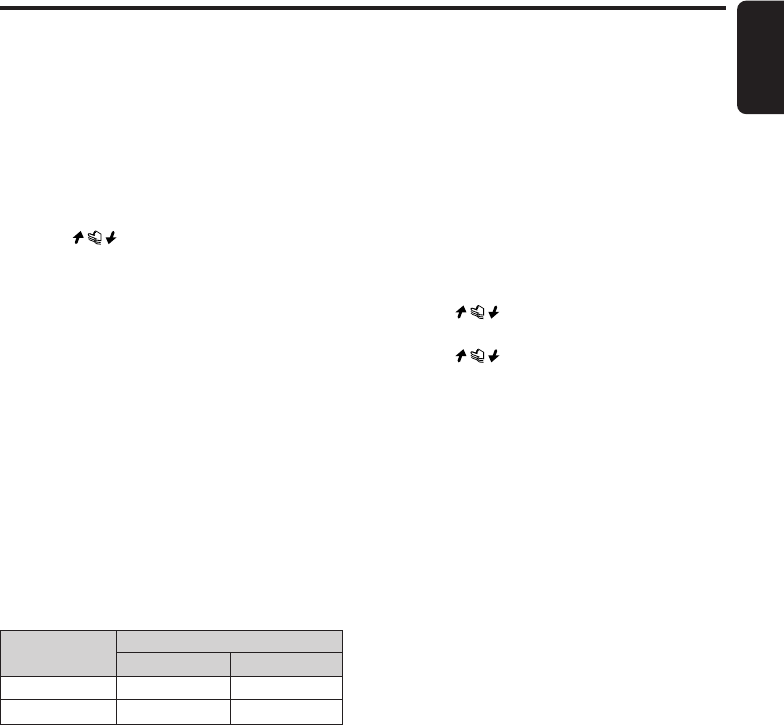
• Depending on the settings for SPEAKER
SELECT, filters (HPF or SUB-W LPF) that can
be adjusted differ. In the table below, “YES”
refers to the item you can adjust while “NO”
refers to the item you cannot adjust.
* This item can be adjusted only when “SUB-
WOOFER” is set to “ON”.
• The factory default setting for FILTER is
“THROUGH”.
Filter adjustment
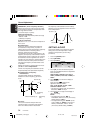
● HPF (High-Pass Filter) adjustment
This filter cuts the signals under the selected
frequency value.
Each touch switches the frequency value as
follows:
THROUGH ➜ 50Hz ➜ 80Hz ➜ 120Hz ➜
THROUGH...
Select the frequency that suits your speaker
when you have installed speakers with smaller
diameter.
Set to “THROUGH” if you use speakers that can
reproduce low frequency sound.
SPEAKER FILTER
SELECT HPF SUB-W LPF*
Dolby PL II No Yes
NORMAL Yes Yes
● SUB-W LPF (Subwoofer Low-Pass Filter)
adjustment
This filter cuts the signals above the selected
frequency value.
Each touch switches the frequency value as
follows:
THROUGH ➜ 50Hz ➜ 80Hz ➜ 120Hz ➜
THROUGH...
Select the frequency that suits your subwoofer.
Set to “THROUGH” if you use powered
subwoofers with built-in low-pass filters.
1. Press the [SOUND] button.
2. Touch [FILTER].
3. Touch
on the left of the display to
select [HPF] or [SUB-W LPF].
4. Touch
on the right of the display to
select the frequency value.
• Select from THROUGH, 50Hz, 80Hz, or
120Hz.
5. Press the [SOUND] button to return to the
original mode.
Setting the music mode
MUSIC mode
If you set Dolby Pro Logic II to “MUSIC”, you
can further adjust the MUSIC mode in detail.
• This is available only when “MUSIC” has been
selected.
• The factory default settings are “NO” for
“PANORAMA”, “3” for “DIMENSION”, and “3”
for “CTR WIDTH”.
Adjustment items
● PANORAMA (Panorama control setting)
Extends the front sound field image to rear
speakers. Set to “YES” if you think the surround
effect is not enough.
● DIMENSION (Dimension setting)
Shifts the sound field image to either front or
rear. Set this item if the sound field image is
weighted on either front or rear side.
The center adjustment value is 3. Select from 0
to 2 for weighting on the rear side. Select from 4
to 6 for weighting on the front side.
● CTR WIDTH (Center width setting) *
Distributes a part of the center speaker sound to
front speakers (left and right).
By distributing the center sound to front
speakers, the entire sound field image, and you
can feel the natural broadening of the sound
field image.
+DXZ958RMC_01-32-Eng.p65 05.1.21, 9:4341