


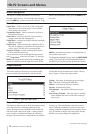


16 TASCAM HD-P2 Owner's Manual
Continued from the previous page
HD-P2 Screens and Menus
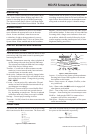
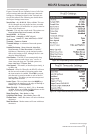
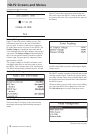
Figure 15 - File Edit Screen
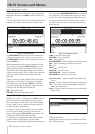
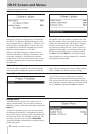
Figure 16 - File Edit in Process
The
SHUTTLE/DATA
wheel moves the menu selection as
it does in any other menu screen. If you wish to use
the
SHUTTLE/DATA
wheel to move the timeline, press and
hold the
STOP
key.
While auditioning the file you can change the In and
Out points by pressing the
LOCATE
Ô/
keys. The
display updates to show the current selection of the
file and the small In/Out time displays also update to
reflect the new position. This is used to trim unwanted
sections of audio from the front and/or end of the
audio file.
Figure 16 shows a section of the file from 4 seconds,
670 msecs to 14 seconds, 70 msecs. If you navigate
to the
Trim
menu item and press
SELECT
it will (after
a confirmation dialog) permanently remove the grey
sections to the left and right from the file.
REW
– Rewind skip play.
STOP-REW
– Return to beginning of file.
F FWD
– Fast Forward skip play.
STOP-F FWD
– Go to end of file.
STOP
– Stop transport.
STOP-SHUTTLE/DATA
– Move timeline forward/backward.
PLAY
– Play file starting at position of up arrow.
REC
– N/A.
LOCATE
Ô
– Set IN point.
LOCATE
– Set OUT point.
STOP-LOCATE
Ô
– Locate to IN point.
STOP-LOCATE
– Locate to OUT point.
More Information
– Leads to detailed file information
screen.
Rename
– Used to rename the file (up to 8 characters).
Trim
– Trim audio from beginning and/or end of file
based on In/Out points.
Delete
– Removes file from project, moving it into the
project trash.
Continued on the next page
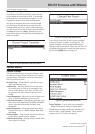
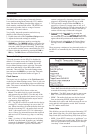
Project Trash Manager
Whenever a “retake” is performed, or
Delete
is chosen
in the File Edit screen, the HD-P2 moves the audio
file to the Project’s Trash folder. The Trash Manager
screen is used to move a file back into the project, or
to delete the file(s) permanently.
In Figure 17 there is only one file in the trash, which
you can select to delete, or to move back into the
project. Selecting the
Delete All Files
menu option will
permanently delete all files from the trash.
For information regarding how much space is being
used by all files, in all projects, visit the Media
Cleanup menu, located in the Media Management area
Figure 17 - Project Trash Screen
of the System Menu.
Deleting files from one project’s trash does not affect
files in other projects.
Project Files Menu
This menu shows a list of all active files in the project.
Highlight a file and press
SELECT
to enter the File Edit
screen.
The File Edit screen is the only screen that disables the
transport keys from normal operation. While in this
screen you use the
REW/FFWD/STOP/PLAY
keys to audition
the current file. The timeline shows where you are in
the file. The top left and right time fields indicate the
current In and Out points of the file. When you first
visit this screen they are set to the start and end loca-
tion of the file.