


14 TASCAM HD-P2 Owner's Manual
HD-P2 Screens and Menus
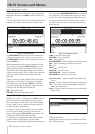
Menu Navigation
The HD-P2’s settings and utilities are accessed
through a menu system. To activate the menu system,
press the
MENU
key and the main menu is shown. To go
back to the operational screen, press the
MENU
key at
any time.
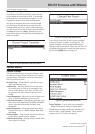
Main Menu
Project Menu
– Used to access all of the settings and
operations for the current project. Not accessible
when media is not present.
Change/New Project
– Used to create new projects or
load existing projects.
System Menu
– Access to all of the system utilities,
settings, tools and disk management.
Display Menu
– Settings for display contrast, backlight,
and power savings.
FireWire Dock
– When connected to a Windows XP or
Mac OS X computer via FireWire this menu item is
used to “dock” the HD-P2 as an external disk.
Unmount CF Media
– Used to unmount the Compact
Flash card before removing.
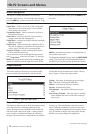
The inverted line on the screen indicates the current
item (
Project Menu
in the case of Figure 12). Pressing
SELECT
will operate on the item. Items containing sub-
menus are indicated with the right arrow icon. When
SELECT
is pressed the next menu, a warning dialog, or
the operation takes place.
To change the highlighted item, rotate the
SHUTTLE/DATA
wheel. If you have an external keyboard hooked up
the HD-P2 you can also use the up/down arrow keys.
Figure 12 - Main Menu Screen
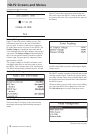
Project Menus
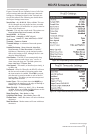
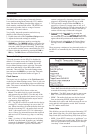
Project Main Menu
This menu applies to the active or currently loaded
project and provides access to the sub-menus and
actions that can be performed on a project. The top
line in Figure 13 shows the project name.
Figure 13 - Main Project Menu Screen
Settings
– Sub-menu for changing project settings.
Files
– Sub-menu of all project audio files.
Markers
– Sub-menu of all project markers.
Rename
– Rename this project.
Trash Manager
– Sub-menu of all items in project
trash.
Save as Project Template
– Turn this project’s settings
into a template that can be used when creating a
new project.
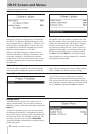
Project Settings Menu
This menu provides access to all of the settings related
to the current project, including timecode (a sub-
menu). Settings are listed with their name on the left
side and current value on the right. A setting with its
name in italics is disabled and cannot be selected or
changed. This may be due to a dependency on another
setting (e.g. Timecode Settings cannot be entered
unless timecode is enabled), or system states (most
settings cannot be changed while the transport is mov-
ing). As another example, since this project already
has files you cannot change the sample rate.
Continued on the next page
Continued from the previous page