


Appendix B StorNext Administration Tasks
Connecting to a StorNext Network Using Xsan 1.4.2
StorNext 3.1.3 Installation Guide 118
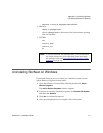
sudo mount -t acfs fsname /Volumes/fsname (where <fsname> is the
name of the file system). The SNFS filesystem should now be
mounted on the OS X computer.
Creating the
automount.plist File 2
In order to mount the StorNext file system whenever the Macintosh client
is rebooted, configure the automount.plist file. Xsan 1.4.2 uses the
automount.plist file to mount SAN volumes.
1 Use the command vi /Library/Filesystems/Xsan/config/automount.plist
to create the automount.plist file.
2 Copy and paste the text from the automount.plist template below into
the file you just created.
3 Change Volume_name to the name of your mounted file system.
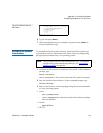
The automount.plist Template 2
Copy and paste the text from the following template into the
automount.plist file as described in step 2 above.
<?xml version=”1.0” encoding="UTF-8”?>
<!DOCTYPE plist PUBLIC “-//Apple Computer//DTD PLIST 1.0//EN”
“http://www.apple.com/DTDs/PropertyList-1.0.dtd”>
<plist version=”1.0?>
<dict>
<key>Volume_name</key>
<dict>
<key>AutoMount</key>
<string>rw</string>
<key>MountOptions</key>
<dict/>
</dict>
<key>Another_volume_name</key>
<dict>
<key>AutoMount</key>
<string>rw</string>
<key>MountOptions</key>
<dict/>
</dict>
</dict>
</plist>