


11SilverBoom 300
www.silverstarlifts.com
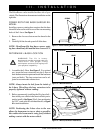
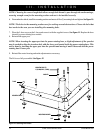
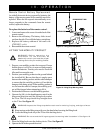
BOOM-ARM ADJUSTMENT
Before adjusting the boom-arm, lower the lifting hook
about 12 in. (30.5 cm). This will provide enough slack in
the strap to enable the adjustable portion of the boom-
arm (top tube) to be pulled out of the bottom tube to its
farthest adjustment hole. See figure 9.
To adjust the boom-arm:
1. Remove the bow tie cotter pin from the adjustment
pin and remove the adjustment pin.
2. Slide the top tube in or out to the desired adjustment
hole.
3. Align the adjustment holes of the top and bottom
tube and reinsert the adjustment pin.
NOTE: Do not force the pin into the adjustment
hole. Be sure that the strap is not pinched when
inserting the pin.
4. Reinstall the bow tie cotter pin into the adjustment
pin to secure the boom-arm.
III. INSTALLATION
ADJUSTMENT PIN
TOP TUBE
LIFTING HOOK
ADJUSTMENT HOLES
BOTTOM TUBE
Figure 9. Boom-arm Adjustment
BOW TIE COTTER PIN
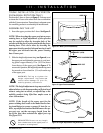
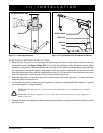
L-BASE INSTALLATION
After determining the ideal spot for your lift to be permanently mounted, remove the entire lift from the vehicle
except for the L-base.
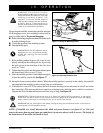
1. Inspect the undercarriage of the vehicle where the lift L-base is located for obstructions that may hinder the
installation of the five (5) mounting bolts that will secure the L-base to the vehicle. Obstructions may consist of
electrical wiring, gas tank, bumper mounts, or exhaust pipes. You may need to adjust the base extensions to
clear obstructions. If possible, install the L-base with the base extensions fully extended. See figure 10.
WARNING! Explosive Conditions Hazard! The bumper mounts on some vehicles are gas
pressured. DO NOT drill into them.
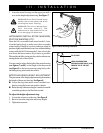
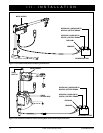
2. If all is clear under the L-base, mark the position of the five (5) mounting holes and drill them using a 3/8-in. drill
bit. Drill all mounting holes from inside the vehicle. See figure 10.
3. Reinstall the L-base and align the mounting holes of the L-base with the holes you just drilled.
4. Position the T-bar on the end of the base support that runs parallel with the rear of the vehicle, and install a
mounting bolt and washer through it and the L-base. See figure 10.
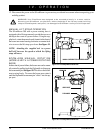
NOTE: When the lift is installed inside a trunk, it may be necessary to remove the motor housing and
upper post for the trunk to close.
5. Install the four (4) remaining mounting bolts and washers onto the L-base.
Tools needed for installation:
" Power drill " 3/8” drill bit " Adjustable wrench " Socket set
" Phillips head screwdriver