


10
SilverBoom 300
www.silverstarlifts.com
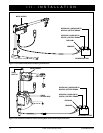
III. INSTALLATION
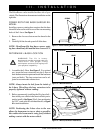
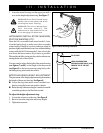
Figure 7. Motor Housing Installation
3. Lower the motor housing over the upper post until it
rests on the height adjustment ring. See figure 7.
WARNING! Pinch Point Hazard! Keep
hands clear of the upper post when
lowering the motor housing.
WARNING! The lift will be top heavy
until mounted securely. Get
assistance to help stabilize the lift
while swinging the boom-arm.
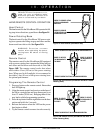
HATCHBACK INSTALLATION- MINIVANS,
STATION WAGONS, ETC.
Once the lift is assembled and seated on the L-base,
close the hatch slowly to make sure it does not make
contact with it. If the lift is too close to the rear, adjust its
position slightly until the hatch can close without making
contact with the lift. Positioning the L-base close to the
rear allows the boom-arm to stay as short as possible.
This enables the lift to swing into the vehicle without con-
tacting the far side of the vehicle.
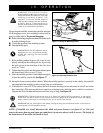
You may need to adjust the height of the motor housing
(see figures 7 and 8) or the length of the boom-arm
(see figure 9) so the boom-arm can swing freely with-
out hitting at any point inside the vehicle.
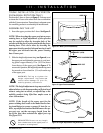
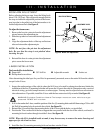
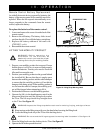
MOTOR HOUSING HEIGHT ADJUSTMENT
The placement of the height adjustment ring determines
the height of the motor housing. See figure 8.
" Lower the ring when more room is needed over-
head to swing the boom-arm inside a vehicle.
" Raise the ring when more height is needed to enable
a mobility product to be lifted into a trunk.
To adjust the height adjustment ring:
1. Loosen the setscrew on the ring. See figure 8.
2. Raise or lower the ring to the necessary height.
3. Tighten the setscrew.
Figure 8. Height Adjustment Ring Position
SETSCREW
HEIGHT ADJUSTMENT RING
SECURE NO CLOSER THAN 6” (15 CM)
FROM THE TOP OF THE POST.
TOP OF POST