


MM-012099-001, Rev. B
52
8.21.2 Declaring an Emergency Call
Perform the following steps to send an emergency call to a selected system and group (or on an optionally
pre-programmed group).
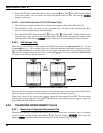
1. Press and hold the red EMERGENCY button that is on top of the radio in front of the antenna for
approximately one second (this time is programmable and therefore could be longer or shorter; check
with the system administrator). The radio will transmit an emergency call request with the radio ID
until an emergency channel assignment is received.
2. When the working channel assignment is received, the radio sounds a single beep indicating the radio
has auto keyed (see Table 8-4) and is ready for voice transmission. *TXEMER* flashes on line two in
the display until the emergency is cleared.
3. Press PTT and speak into the microphone in a normal voice.
and momentarily turn ON.
4. Release PTT when the transmission is complete.
To clear the emergency first press and hold the
button. While continuing to hold the button, press the
EMERGENCY button. (This will work if the radio is programmed to clear emergencies.)
8.22 INDIVIDUAL CALLS
8.22.1 Receiving and Responding to an Individual Call
When the radio receives an individual call (a call directed only to the user's radio), it un-mutes on the
assigned working channel and displays
. The first line on the display shows the logical ID number of the
unit sending the message, or the associated name if the ID number is found in the individual call list. The
radio can be programmed to ring when an individual call is received. If enabled, the ring begins five
seconds after the caller un-keys and will continue until the PTT button, the
button or the individual call
mode is entered.
The volume of the ring is adjustable through the volume control levels.
If a response is made by pressing the PTT to the call prior to the programmed call-back time-out, the call
will automatically be directed to the originating unit. If a response is not made before the call-back time-
out, the radio will return to normal receive display, and *WHC* will appear on the first line of the LCD.
To respond after the call-back time-out, press the
key. The radio's display will show the callers ID on
the first line and WHCI=1 on the second line. Pressing the PTT button at this point will initiate an
individual call back to the original caller.
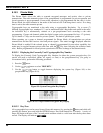
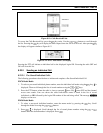
The radio stores the IDs of the last 10 callers in the Calls Received List as shown. Individual calls are
stored in the top half of the list (1-10) and Group calls are stored in the bottom half of the list (1-10). The
most recent call is stored in position 1, the second most recent call is stored in position 2, etc.