


10
TASCAM DR-701D
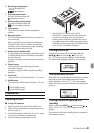
Inserting SD cards
1. Open the front cover on the front of the unit.
2. Insert an SD Card into the slot as shown in the
illustration until it clicks into place.
CAUTION
•
SD cards that meet SD, SDHC or SDXC standards
can be used with this unit.
•
A list of SD cards that have been confirmed to
work with this unit can be found on the TEAC
Global Site (http://teac-global.com/).
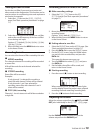
Connecting external stereo mics and
monitoring equipment
Connect an external stereo mic to the EXT IN 1/2 jack
on the left side of the unit.
To listen with headphones, connect them to the
PHONES jack.
Headphones
External mic
To listen with an external monitoring system
(powered monitor speakers or an amplifier and
speakers), connect it to the LINE OUT jack on the
right side of the unit.
Powered monitor speakers
or amplifier and speakers
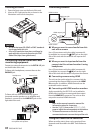
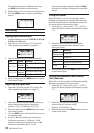
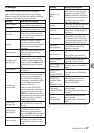
Connecting cameras
HDMI monitor
Audio output jack
External mic input jack
DSLR camera
HDMI output jack
HDMI input jack
8
When you want to record audio from this
unit with a camera
Use a 3.5mm stereo mini plug cable (commercial-
ly-available) to connect the OUT jack on the right
side of this unit with the external mic input on the
camera.
8
When you want to input audio from the
camera into this unit and monitor it using
headphones
Use a 3.5mm stereo mini plug cable (commercial-
ly-available) to connect the IN jack on the right
side of this unit with the audio output on the camera.
8
Connecting cameras using HDMI
The unit can be synchronized to a camera clock by
connecting the camera HDMI output to the HDMI
IN connector. In addition, HDMI timecode can be
received from the camera.
8
Connecting with HDMI monitor recorders
Audio recorded by the DR-701D can be added to
HDMI video input from a camera and then output
from the HDMI OUT connector. The unit can also
output the received HDMI timecode.
NOTE
•
Refer to the camera’s operation manual for
information about its connectors.
•
Use the
CAMERA
item on the
OUTPUT LEVEL
page to adjust the volume output to the camera.
•
To mount the camera on this unit, use the
camera attachment screw on the top of the unit.
Using the TIMECODE IN connector
When recording starts, time can be acquired from
timecode and recorded in the BWF Time Reference
field.