


RAIDBank5 Owner’s Manual
31
5-Host Computer Setup
3. Volume Setup on Microsoft Windows Vista/7/2008
Installation on a Windows system requires a Windows Installation with a properly installed
and configured respective host bus.
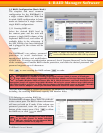
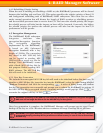
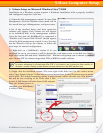
3.1 Open the disk management console. To open Disk
Management, click the Windows Start menu orb. In
the search box type diskmgmt.msc, and press enter.
A list of the attached drives and their respective
volumes will appear. Each Volume set will appear
as an individual disk in the management console.
Upon the first time the RAIDBank5 is connected, a
“Initialize and Convert Disk Wizard” should appear
when the disk management console is run. You may
use the Wizard to set up the volume, or follow the
next steps for manual configuration.
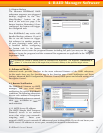
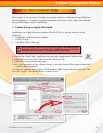
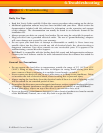
3.2 Right-click on a RAIDBank5 volume. If it’s not
initialized for use in your system, it will be denoted by a red down arrow on its disk icon
.
Right click on the disk and select “Initialize Disk.” Windows will prompt you to choose a partition
style. Choose GPT for volumes larger then 2TB, or MBR for smaller volumes.
Note: The GPT Partition style is not recognized by all previous versions of Windows, and is required
for proper addressing of volumes larger than 2TB. If you intend to use a volume on older versions of
Windows, consider creating multiple smaller volumes partitioned in the MBR partition style.
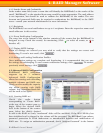
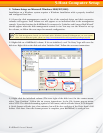
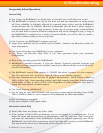
3.3 Right click the initialized volume (The area right of the disk icon.) In the context menu,
select “New Simple Volume.” Follow the on screen instructions. In the File System pop-up menu,
select NTFS. The default formatting option is quick format, which will take just a few minutes,
but will do less verifying of the Drive than a Full
format. A Full format will take about 30-90 minutes.
Once the format process is
complete, your RAIDBank5
is ready to use.
3.2
3.3