


RAIDBank5 Owner’s Manual
12
Installing the Included host bus adapter
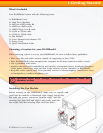
1. Turn your computer off and any peripherals connected to the computer (ie. printers,
external hard drives, etc.). Unplug the power cable from the rear of the power supply on
the back of the computer.
2. Remove the cover or door to access your computer’s expansion slots. For more information
on how to access your computer’s expansion slots consult your computer’s user manual.
3. Locate an open PCI Express slot and remove the metal cover plate on the rear of the
computer case (1X ~ 16X lane slots supported).
4. Insert the card into the open PCI Express slot and fasten the bracket to the rear of the case,
per your computer’s documentation.
5. Connect an LP4 molex power connector from the computer’s power supply to the LP4
connector on the card.
6. Replace your computer cover and reconnect power.
7. Power on your computer. Windows machines should automatically identify the new
hardware and install drivers. If driver installation is not successful, insert the provided
Driver CD into the computer’s CD/DVD drive. Autorun should start the installation program,
(If Autorun does not start, Go into “My Computer” and access the CD/DVD drive that the
CD is in, and run the “setup.exe” file located on the CD.) Follow the instructions onscreen
to complete the driver installation.
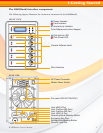
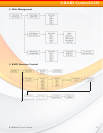
RAID System Management Controls
Following the hardware installation, the RAIDBank5 must be configured and the volume
set units initialized before they are ready to use. This can be accomplished by one of the
following methods:
• RAID Mode Selector Switch
• Front panel touch-control keypad
• RAIDBank management Software
These user interfaces can access the built-in configuration and administration functions that
reside in the controller’s firmware. Advanced features such as multiple volume support, remote
notification, firmware updates, etc are accessible via the RAIDBank Management software.
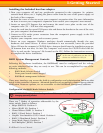
Configuration via RAID Mode Selector Switch
IMPORTANT: Changing the mode of operation will destroy all existing data! Please use care when
changing operating modes!
!
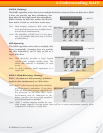
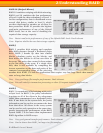
There are 7 Modes of operation addressable by the
rotary switch, listed as follows:
• Stripe (RAID 0)- Position 0
• Mirror (RAID 10)- Position 1
• Cloned Mirror (RAID 1)- Position 2
• RAID 3 (Fixed Parity)- Position 3
• Graphic User Interface (GUI) Control- Position 4
• RAID 5 (Distributed Parity)- Position 5
• Large Mode (Span)- Position 6
• Port Multiplier (JBOD)- Position 7
Note:
At the time of publication no Mac OS X
drivers are available for USB 3.0
1-Getting Started
Settings/mute/backup