


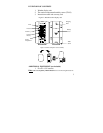


9
D. TIME ZONE SETTING
1. –5 should be flashing in the time LCD
2. Select your appropriate time zone by pressing and
releasing the “CH/+” button. The time LCD displays
the 3 letter abbreviations for the time zones found in
North America along the very top of the display.
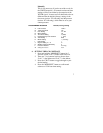
Follow the chart below to find the correct time zone
and the corresponding abbreviations and codes.
GMT 0
Atlantic -4
EST; Eastern -5
CST; Central -6
MST; Mountain -7
PST; Pacific -8
ALA; Alaska -9
HAW; Hawaii -10
Note: There are more time zones represented by number than there
are represented by letters. If you live in North America only the
ones in the chart above will be needed to set the correct time zone
for your location.
3. Press the “MODE/SET” button to confirm and
advance to the daylight saving time setting.
E. DAYLIGHT SAVING TIME (DST) SETTING
1. “DST” and “1” should now be flashing in the time
LCD.
Note: 1 = ON and 0 = OFF Some locations (Arizona and parts of
Indiana) do not follow Daylight Saving Time.