


Basic Operations (Recording)
29
At the end of your recording the display will read "0:00"; recording will then
automatically stop and the VCR will turn itself off.
To stop recording while in the IRT mode, press the POWER button and
then press the STOP button (this can be done either on the VCR or with
the remote control) within 10 seconds.
Setting the VCR to Record Later
With the delayed recording feature, you can set this VCR so that it
automatically comes on and records programs whenever you like - without
your being around! You can record a program one time only, or you can
automatically record a show every weekday or every week at the same
time. You can preset as many as 8 timed recordings at once.
Recording is even easier when you have set up your channels for VCR
Plus+. Learn the basics of delayed recording in this section. Then read
about VCR Plus+ beginning on page 40.
We suggest you try all the different ways of programming the VCR when
you have some leisure time, so you can learn how it works. That way,
when an important show is going to be on that you really want to record,
you'll be confident that your timed recording setup will work.
Types of Delayed Recordings
ONE TIME Records one show at a particular date and time.
DAILY Records a show at the same time every day of the week,
Monday through Friday.
WEEKLY Records a show at the same day and time every week.
Your VCR can record up to 8 programs at different days and times, or up
to 8 programs on the same day.
Before You Begin
Assemble the information you need for timed recording:
Be sure that the clock is set to the correct time.
Date and day of the program
Starting time
Ending time
Channel to be recorded
Blank or erasable videocassette (safety tab intact)
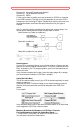
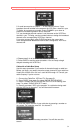
Delayed Recording Steps
You set up the delayed recording using the on-screen Easy Guide
System.
Press GUIDE, then press 2 for DELAYED RECORDING. Press number
buttons 1, 2 or 3 for ONE TIME, DAILY, or WEEKLY RECORDING. Follow
the flashing instructions on screen to complete the programming.
Remember to press 0 before single-digit channel numbers, times, and
dates - for example, 0 and 6 for channel 6.
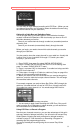
After you enter the channel and time, the VCR automatically shows the
current date or the next date, whichever is most logical. Leave the date as
it comes up, or enter new digits for the month and day.
You can correct any item entered as you go by pressing the CLEAR
button repeatedly until the digit to be corrected flashes on the screen.
Then, punch in the correct number. Illogical times and dates won't be
accepted.
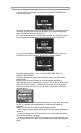
If you want to record from external equipment, press AVX button to
select LINE1 or LINE2 instead of the channel number.
When everything is set as you want (even though some items may still
be flashing), press GUIDE to program your settings into memory.