MM101332V1, Rev. K
11 TRUNKED OPERATION
This section describes P25 Trunked and EDACS operation.
11.1 SCANNING TRUNKED GROUPS
Groups that have been previously added to the scan list on a per system basis may be scanned. Each
system's group scan list is retained in memory when the radio is powered OFF or when the battery pack is
removed.
The following procedures outline scan operations for trunked groups. See the conventional mode
operating procedures for specific procedures on conventional channel scanning.
11.1.1 Turning Scan On and Off
1. Toggle Scan operation ON by pressing (Scan model) or (System model). icon rotates
clockwise to indicate radio is scanning.
2. Toggle Scan operation OFF by again pressing
(Scan model) or (System model). will
disappear.
• If the radio scans to a group other than the selected group then receives a call on the selected
group, the radio will switch to the selected group. However, if the “scanned-to” group is
programmed at a higher priority the radio will remain on the “scanned-to” group.
• The radio will continue scanning if a new group is selected when scan is ON.
Pressing the PTT button when scan is ON will cause the radio to transmit on the displayed group or to the
currently selected group (depending on programming).
11.1.2 Adding Groups to a Scan List
11.1.2.1 Scan Model
1. Scan must be OFF to add/delete groups to/from the scan list. If the Scan icon
is ON, press the
key to turn Scan OFF.
2. Select the desired group using the SYSTEM/GROUP/CHANNEL knob and/or the
or keys.
If the selected group is currently on the list, pressing
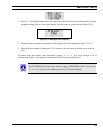
will display on line three.
3. If the scan list status icon is blank (
), the group can be added to the scan list by pressing the key.
will be displayed on line three.
4. Press the
key a second time to set the group to Priority 2. A is displayed on line three.
Press
a third time to set the group to Priority 1. A is displayed on line three. The priority level
section sequence only advances the group to the next high priority level and stops at priority level 1. To
select a lower priority level, the group must be deleted from the scan list and then added back to the scan
list. Each new group added to the scan list starts at the lowest priority. If the Priority 1 and Priority 2
groups are already set and a new group is assigned as Priority 1 or Priority 2, the previously assigned
41