MM101332V1, Rev. K
8.1 CONTROLS
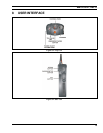
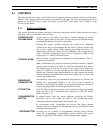
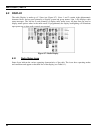
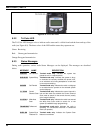
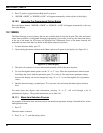
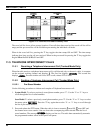
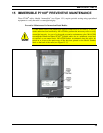
The radio features two rotary control knobs and an emergency button mounted on the top of the radio.
Push-To-Talk, option and monitor buttons are mounted on the side. The front mounted keypad has no
buttons on the P7130
IP
Select model, six buttons on the P7150
IP
Scan model, and 15 buttons on the
P7170
IP
System Radio.
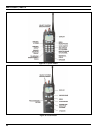
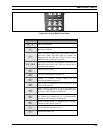
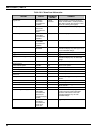
8.1.1 Buttons and Knobs
This section describes the primary function of the button and knob controls. Other functions associated
with these controls are detailed in later sections.
Applies power to and adjusts the receiver’s volume. Rotating the control
clockwise applies power to the radio. A single alert tone (if enabled through
programming) indicates the radio is operational.
Rotating the control clockwise increases the volume level. Minimum
volume levels may be programmed into the radio to prevent missed calls
due to a low volume setting. While adjusting the volume the display will
momentarily indicate the volume level (i.e. VOL=31). The volume range is
from a minimum programmed level of zero (displayed as OFF in the
display) up to 31, which is the loudest level.
POWER ON-OFF
VOLUME KNOB
CONTROL KNOB
Selects systems or group/channels (depending on programming). This is a
16-position rotary knob.
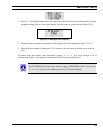
Note: A mechanical stop, which can limit the positions accessed, is shipped
with the radio but must be installed. To install the mechanical stop, remove
the channel knob, loosen the set screw on the channel knob metal base
(using a 1.27mm hex wrench), and remove the channel knob metal base.
Replace the 16 channel ring with the channel stop ring located at the desired
channel. Reinstall the channel knob metal base, tighten the set screw, and
reinstall the channel knob.
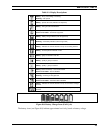
EMERGENCY/
HOME BUTTON
Automatically selects the pre-programmed Group/System by pressing and
holding for a programmed duration. It can also be used to declare an
emergency by pressing and holding for a programmed duration. The button
must be pre-programmed for either operation, but not both.
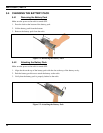
PTT BUTTON
Push-To-Talk must be pressed before voice transmission begins. In trunked
mode the radio’s ID is transmitted upon depression of the PTT button.
(Refer to
Figure 8-2.)
CLEAR/MONITOR
BUTTON
In trunked mode: Exits the current operation (removing all displays
associated with it) and returns the radio to the selected talk group.
Terminates individual and telephone interconnect calls.
In conventional mode: Unsquelches the receiver and allows channel
monitoring prior to transmission. Momentarily removes the Channel Guard
decoding from the channel.
Activates one of a number of programmable software options selected
during PC programming. Programmable options include hi/low power
settings, keypad lock, LCD contrast, LCD and keypad back lighting.
OPTION BUTTON
21