


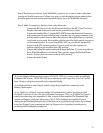
Remember that power and audio input signal need to come in through the wall baffle, and speaker
signal needs to go out through the Baffle, to the satellites. Be sure that there is necessary clearance
for these requirements.
Installation and Hookup of the Subwoofer
The following is a step by step guide for installing the Subwoofer on a wall.
NOTE: The instructions below are for walls with wooden studs. For installations not having wooden studs,
it is the responsibility of the installer to attach the Wall Baffle in a safe manner to the building structure.
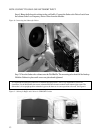
Step 1: Locate two wall studs in the vicinity of the desired location for the Subwoofer. The
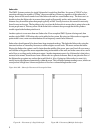
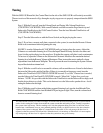
Subwoofer’s Wall Baffle has several holes in predetermined locations that should interface with the
wall studs of walls built to typical standards. See Figure 7.
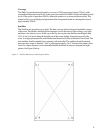
Figure 7 – Wall Baffle Mounting Holes
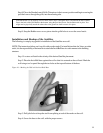
Step 2: Place the Wall Baffle up against the wall and mark the wall with a pencil or a tool, through
the holes that match the stud standard for your wall. Your marks should be centered with the stud.
You should have a minimum of four points marked on the wall. Be sure that you are also lined up
with any wall outlets or junction boxes that have been setup for powering the Subwoofer.
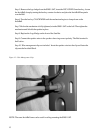
Step 3: Drill undersized holes for a wood screw, at each of the marked points.
11