


Advanced Operations (Second VCR)
68
Advanced Operations (Second VCR)
Integrating a Second VCR
With another VCR hooked up, you can copy videotapes as needed, and you can get
fancy with multimedia programming. For this discussion, we refer to the model VT-
F494A Hitachi as VCR2 and the other unit as VCR1.
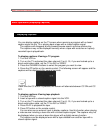
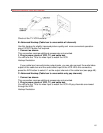
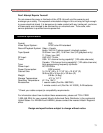
Hookup
To hook up a second VCR, you need:
A video cord with a single jack on each end, and
An audio cord with two jacks on each end, or
A three-way cord that has both audio and video jacks
Study the back of VCR2 (VT-F494A) to find the three color-coded jacks that are labeled
IN. The yellow jack is for video, red and white are for audio. Locate similar jacks on
VCR1. Then, with the power:
Connect VIDEO OUT on VCR2 to the yellow VIDEO IN on VCR1.
Connect the AUDIO OUT jacks (left and right) on VCR2 to the AUDIO IN
jacks (left and right) on VCR1. Be sure to match left to left (white) and right to right
(red).
Second VCR Hookup
Copying from One VCR to Another (Dubbing)
Consider VCR1 the recording VCR, and VCR2 (VT-F494A) the play-back VCR. You
will play a tape on VCR2 and record it on VCR1. To begin copying:
Insert the videotape you wish to record in VCR2.
Insert a blank or erasable tape (with the safety tab intact) into VCR1.
Press AVX on VCR1--the LINE indicator will display.
Press REC on VCR1, and press PLAY on VCR2.
To monitor the picture as you record, VCR1 must be connected to your TV (follow
instructions in the other VCR's manual). Press the VCR/TV button on the remote. The
VCR indicator will light on VCR1's display and you can view the picture being recorded.