


21. Click Apply. The confirmation message indicating if it is OK to apply the setting to the storage
system is displayed.
22. Click OK. The confirmation message closes and the new V-VOL information is applied to the
subsystem.
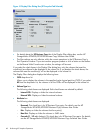
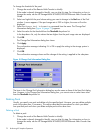
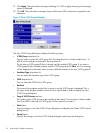
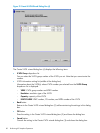
Figure 17 New V-VOL Group Dialog Box
The New V-VOL Group dialog box displays the following items.
• V-VOL Group drop-down list
You can select or enter the V-VOL group ID in the drop-down list. A whole number from 1 to
65536 can be selected or entered in the drop-down list.
Do not enter a V-VOL group ID that is already used by another V-VOL group. If you enter a
V-VOL group ID that is already used by another V-VOL group and click Next, an error message
will be displayed. In that case, select or enter a different number for the new V-VOL group ID.
• Emulation Type drop-down list
You can select the emulation type of the V-VOL group.
• CLPR drop-down list
You can select the CLPR of the V-VOL group.
• Attribute
The name of the program product that is going to use the V-VOL group is displayed. This is
the name of the program product whose icon you right-clicked in order to display the New
V-VOL Group dialog box.
• Copy of V-VOL Groups text box
The number of the V-VOL groups to be copied can be entered. You can enter a whole number
from 0 to 63231. Note that no V-VOL group will be copied if you enter 0.
• Next button
Fixes the settings in the New V-VOL Group dialog box and displays the Create V-VOL wizard
dialog box (1).
• Cancel button
Cancels the settings in the New V-VOL Group dialog box and closes the dialog box.
76 Performing XP Snapshot Operations