


1. Change the mode of the Remote Web Console to Modify.
If the mode is already changed to Modify, you can skip this step. For information on how to
change the mode, see the HP StorageWorks XP24000/XP20000 Remote Web Console User
Guide.
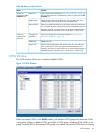
2. Right-click XP Snapshot in the Pool tree of the Pool window (“Pool Window” (page 56)). A
menu is displayed.
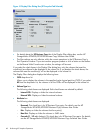
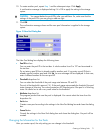
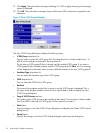
3. Select New Pool from the menu. The New Pool dialog box (“New Pool Dialog Box” (page 71))
is displayed.
Enter the pool ID in the Pool ID text box.
You can enter only a whole number from 0 to 127 in this text box. Do not enter any number
that is already used for another pool.
Select the threshold of the pool usage rate from the Threshold drop-down list.
CAUTION: If the usage rate of the pool exceeds the threshold, you cannot create new XP
Snapshot pairs. Make sure you do not set too small a value for the threshold.
4. Check the contents of the setting and if there is no problem, click Set. The New Pool dialog
box closes and the new pool will be displayed in the Pool tree.
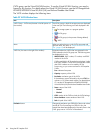
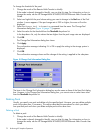
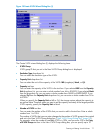
5. Select the pool in the Pool tree.
6. Select the volumes which you want to register in the pool as the pool-VOLs from the Free LDEVs
list.
• If you select the CU number from the CU drop-down list, the volumes in the CU will be
displayed in the list. Within the same CU, you can select multiple volumes at the same
time.
• If you select an LDKC from the LDKC drop-down list, only the CUs in the selected LDKC
are displayed in the CU drop-down list.
• See the notes in “Notes on Using External Volumes as Pool-VOLs” (page 41) when you
select an external volume.
7. Click Add Pool-VOL.
The dialog box that lists the volumes you selected in Step 6 is displayed.
If you select and right-click the volume in the Free LDEVs list, a pop-up menu will be displayed.
If you select the Add Pool-VOL command from the pop-up menu, the result will be the same
as when you click Add Pool-VOL.
8. Check the list of the volumes on the dialog box, and, if there is no problem, click OK. The
dialog box closes and the selected volumes will be displayed in the Pool-VOL list.
9. To add more pool-VOLs, repeat Step 5 and the subsequent steps.
• The total capacity of the pool-VOLs in the pool is the storage capacity of the pool. See “
Notes on Defining Pool Capacity” (page 40) for notes on creating a pool.
• The capacity of the pool management blocks in use will increase if you add the pool-VOLs.
You need to be careful to keep the capacity of the pool management blocks in use to less
than its total capacity.
70 Performing XP Snapshot Operations