


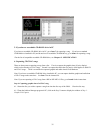
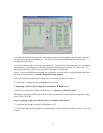

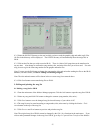


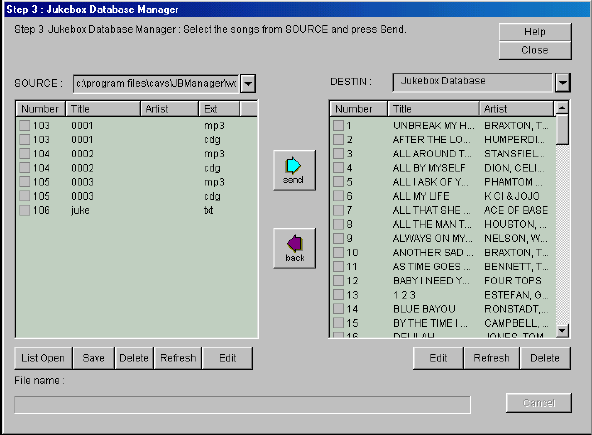
8.3.2 Select the SOURCE directory as the one in which you have saved the graphic (cdg) and audio (mp3) files.
All files in the directory will be displayed. The DESTIN directory will automatically show the songs files in
JB-99.
8.3.3 Click on the files that you wish to send to JB-99. There is a limit of 100 songs that can be transferred at
any one time. Also change or confirm the song number, title, and artist of the files you wish to send. For each
song, be sure to give the same song number for the graphic and audio files.
Note: You may use the Edit button to change the song number, title, and artist after sending the files to the JB-99
database (For more details, see Item 9. Editing and Printing Songlist).
Note: The title and artist names will be shown in the on–screen song list as entered above.
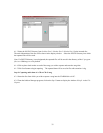
8.3.4 Click Send button to start transferring files to JB-99.
9. Editing and printing the song list
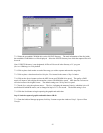
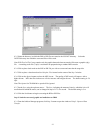
9.1 Making a song list for JB-99
9.1.1 From the main menu of the Jukebox Manager program, Click the Juke button to open the song list of JB-99.
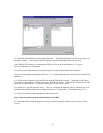
9.1.2 Select any song and click Edit button to change the contents (song number, title, artist ).
9.1.3 Click Save button to save the changed song list into a directory of your choice in PC.
9.1.4 The song list may be sorted according to song number, title, artist name by clicking the Number / Title /
Artist buttons on the top of the song list.
9.1.5 Click Preview and Print buttons to preview and print the song list.
Note: The original song list of JB-99 can not be changed by the Edit / Save functions in the main menu. If you
wish to make permanent changes in the song list of JB-99, go to Step3: Captured Data Transfer of the Jukebox
45