


76
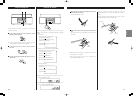
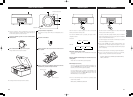
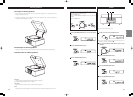
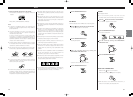
Conexión
AUDIO OUT
RL
PRECAUCIÓN:
< Apague el equipo antes de realizar las conexiones.
< Lea las instrucciones de cada componente que intente utilizar
con esta unidad.
< Asegúrese de introducir cada enchufe hasta que quede bien
fijado. Para evitar ruidos y zumbidos, evite atar los cables de
interconexión de señal junto con el cable de alimentación de
CA y los cables de los altavoces.
A
B
C
D
Reproductor de CD, Deck de Cassette, etc.
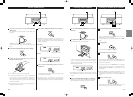
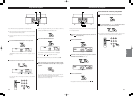
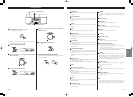
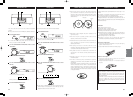
Antena de cuadro de AM
La antena de cuadro de AM de alto rendimiento que se
suministra con esta unidad es suficiente para una recepción
óptima en la mayoría de zonas.
Coloque la antena para una mejor recepción.
Para colocar la antena en una superficie, fije el gancho en la
ranura de la base de la antena.
Conecte los cables de la antena de cuadro a los terminales
de la antena de AM.
A
25
ENGLISH
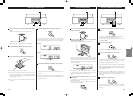
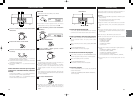
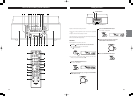
Recording 1
You can record a source of CD, record, radio broadcast and
external audio device connected to the AUX IN terminal to the
USB flash memory or SD memory card.
Turn the FUNCTION/REC LEVEL/SELECT knob to select a
source (CD, PHONO, TUNER or AUX) to record.
1
When you select a MP3 source to record, NO REC will appear
in the display. MP3 file cannot be recorded.
< If you want to record the tracks of CD in a desired order,
program the tracks before recording.
< Repeat playback and shuffle playback works while recording.
If you want to record tracks in normal order, cancel these
modes.
< If you want record a broadcast, tune in the station before
recording.
< While recording from FM broadcast, noise may increase. To
reduce unwanted noise, outdoor antenna will be required or
record it with the FM mode switched to MONO.
Connect a USB memory stick or SD memory card to
record on.
2
“READING” appears for a few seconds.
< If you want to record to a SD memory card, make sure the
lock switch of the SD memory card is set to “unlock”.
34 6
21 5
The unit enters record pause mode.
“REC” and “USB” or “SD” indicator blinks. The red indicator
on the RECORD button blinks.
< No button will work while “DEV BUSY” is displayed. Wait a
few seconds until “DEV BUSY” disappears from the display.
< If the source is MP3 CD, USB or SD, “NO REC” will appear on
the display. These sources can not be recorded.
Select the recording device.
Each time the MENU button is pressed, the recording device is
changed USB or SD.
4
Press the RECORD button (K).
3
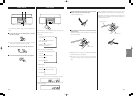
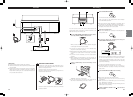
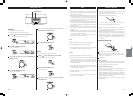
If necessary, adjust the recording level using the
FUNCTION/REC LEVEL/SELECT knob.
5
Play the source to be recorded and adjust the recording level
so that the loudest sound does not exceed the “OVER”
indicator on the peak level meter (If the source is CD, press
the PLAY/PAUSE button. CD playback starts but the recording
pause mode will be kept.)
The level can be adjusted from MIN, –60 to 17, MAX.
< The default setting is 0 dB. When the unit is turned on, or
when the STOP button is pressed, the setting is automatically
reset to 0 dB.
Press the RECORD button (K) to start recording
< Never unplug the power cord during recording.
When you start playing a CD, this unit starts recording
automatically.
< When you don’t slot a USB memory stick or an SD memory
card, “NO DEVICE” is displayed.
When the playback of the source has been finished, press the
STOP button to stop recording.
If AUX or PHONO is selected in step , play the source
to be recorded.
17
6