


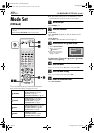

Masterpage:Right-No-Heading
EN
79
Filename [XVS44U_10Subsidiary.fm]
Page 79 25 August 2003 10:58 am
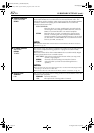
* The default setting is
bold
in the table below.
8
S-VHS MODE
ON
OFF
Your unit can record in S-VHS (Super VHS), S-VHS ET or VHS.
●
To record in S-VHS:
Set “S-VHS MODE” to “ON”. Then, insert a cassette marked “S-VHS”. The
S-VHS indicator lights up on the front display panel.
The S-VHS recording mode is selected.
●
To record in S-VHS ET on a VHS cassette:
Set “S-VHS ET” to “ON”. (
੬
pg. 76) Then, insert a cassette marked “VHS”. The
S-VHS indicator lights up on the front display panel.
●
To record in VHS:
Insert a cassette marked “VHS”.
Set “S-VHS ET” to “OFF”. (
੬
pg. 76)
The VHS recording mode is automatically selected regardless of the “S-VHS
MODE” setting.
●
To record in VHS on an S-VHS cassette:
Insert a cassette marked “S-VHS”. The S-VHS indicator lights up on the front
display panel. Then, set “S-VHS MODE” to “OFF”. The S-VHS indicator goes
off.
The VHS recording mode is selected.
NOTE:
When playing back a tape that has been recorded in S-VHS or S-VHS ET, the S-VHS
indicator lights up on the front display panel regardless of the “S-VHS MODE” setting.
8
FRONT AUX INPUT
VIDEO
S-VIDEO
Select the appropriate mode depending on the connector being used on the
front panel.
VIDEO
: To use the VIDEO input connector on the front panel.
S-VIDEO
: To use the S-VIDEO input connector on the front panel.
8
REAR AUX INPUT
VIDEO
S-VIDEO
Select the appropriate mode depending on the connector being used on the
rear panel.
VIDEO
: To use the VIDEO input connector on the rear panel.
S-VIDEO
: To use the S-VIDEO input connector on the rear panel.
8
AUTO POWER OFF
3H
OFF
When this function is set to “3H”, the unit is turned off automatically if no
operation is done within 3 hours. “AUTO POWER OFF IN 3 MIN” appears on
the screen 3 minutes before the unit is turned off.
XVS44U_01.book Page 79 Monday, August 25, 2003 11:08 AM