


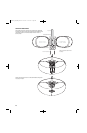
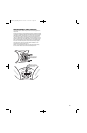

25
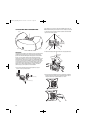
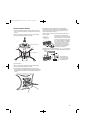
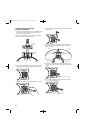
7. Connect the wires to the terminal assembly and place the speaker on
the pole-mount bracket. Repeat this process with speaker A. Return to
the installation procedures and continue.
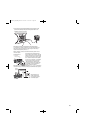
IMPORTANT: Make sure all equipment is turned off before making
any connections. For speaker connections, use a high-quality speaker wire
with polarity coding. The side of the wire with a ridge or other coding is
usually considered positive polarity (i.e., +).
NOTE: If desired, consult your local JBL dealer about speaker wire and
connection options.
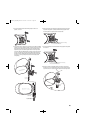
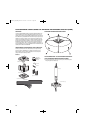
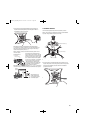
The speakers have coded terminals that
accept a variety of wire connectors. The most
common connection is shown in the diagram
to the left. To ensure proper polarity, connect
each + terminal on the back of the amplifier
or receiver to the respective + (red) terminal
on each speaker, as shown. Connect the
– (black) terminals in a similar way. See
the owner’s guides that were included with
your amplifier, receiver and television to
confirm connection procedures.
IMPORTANT: Do not reverse polarities (i.e., + to – or – to +) when making
connections. Doing so will cause poor imaging and diminished bass response.
Wiring diagram shows
polarity connections for
one channel of a stereo or
home theater system.
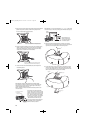
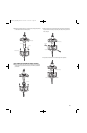
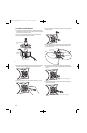
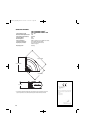
4-CHANNEL WIRING
1. Run the four sets of paired wires out the wire access holes, as shown.
NOTE: This procedure is applicable for both large- and small-diameter
drop tubes. A large-diameter drop tube is shown here.
4-Channel wiring.
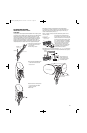
2. Connect the wires to the terminal assembly of each speaker, as shown,
and place the speaker on the mounting bracket, as shown in step 6 of the
mounting-bracket-installation procedures. Return to the installation
procedures and continue.
Figure 36.
Pole-Mount-BracketCap
Drop Tube
Pole-Mount Bracket
Wire Access Holes
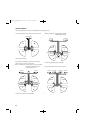
RED = +
BLACK = —
Standard
Connection
RED = +
BLACK = —
1. Strip 1/4" of wire
2. Press and push connector
3. Insert bare end;
release push connector
JBLP2605_CN_CNAW_PM-OM 4/23/08 12:57 PM Page 25