


EVOi.net
26
TROUBLESHOOTING
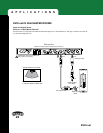
EVOi.net is used as the interface for the set up and
operation of EVO Loudspeakers. The following section
may help in resolving some problems that may occur.
1. The front panel is inoperative and does not
respond to button pressing:
Check the LOCKED indicator. If it is illuminated, then
disengage the LOCKOUT Switch on the rear panel (#14
page 6).
2. The CLIP LED’s on the EVOi.net’s INPUT (#1
page 4) are illuminating:
The input signal level to EVOi.net is too high. Lower the
input level to EVOi.net. This is likely to occur if the EVO
Loudspeakers are not powered up and there is no audible
way of hearing a ‘clipped’ signal. If this is the case,
determine the cause of the EVOi.324’s not producing
sound.
3. The SPEAKER STATUS indicators are flashing:
If only the RED LED is flashing occasionally, it indicates
that the electronics in the EVOi.324 connected to that
OUTPUT has detected a signal level that engages the built-
in limiting circuitry. Lowering the signal level will resolve
this WARNING.
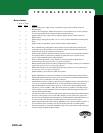
SPEAKER STATUS Error codes
Error codes are flashed as a sequence of two digits. After
the first digit, there is a short gap and after the second digit,
there is a longer (1 second) gap. Errors are prioritized, so if
a speaker has more than one error condition, the most
important error will be shown until it is cleared, at which
point the second error will be shown. Pressing any button
when an error code is being displayed will clear the highest
priority error.
An error/status code is being reported when the green
(OKAY) LEDs begin flashing. Take note of the green
LED’s flashing code and its most likely cause using the
chart on page 27.
After the error code is noted, the less serious errors may be
cleared by pressing any of the rectangular buttons on the
front panel of EVOi.net.
4. I’m sending signal, but one channel is not
working?
Check the configuration of MONO SUM (#15, 16 on page
6). MONO SUM engaged will allow signal from INPUT A
to flow to OUTPUTS 1 & 2 and 3 & 4 simultaneously.
With MONO SUM disengaged, signal from INPUT A will
flow to OUTPUTS 1 & 3 and signal from INPUT B will
flow to OUTPUTS 2 & 4.
5. My rear speakers aren’t working.
Has delay setup been engaged? (Is the DELAY SET LED
on above DELAY SETUP button)?
In a delay setup, typically the rear speakers are lowered to a
level (6-10dB) and delayed (approximately 15ms behind
any signal arriving from the main speakers) that allows
them to effectively disappear, forcing the localization of the
image to the front pair. Use the test function (if enabled) to
determine presence of all 4 speakers.
6. Anti Feedback is on, yet my system is still
feeding back.
Has setup routine been used?
Have all filters been used? While the anti-feedback circuit
has been carefully designed to minimize the impact of
feedback, there will still be a point beyond which the
system is so feedback prone that further increase in gain
will result in additional feedback. A point is eventually
reached where so many feedback frequencies must be
removed, that it either requires an enormous number of
filters, or it requires lowering gain to keep the system
usable. The gain to the microphone should be lowered to
prevent the creation of feedback.