


F:\Joutou\#4090332_Sony_LF-X\4103221121up\4103221121\4103221121LF-
X1\00GB05C01-WW.fm
masterpage: Left
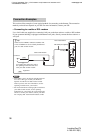
LocationFreeTV
4-103-221-12(1)
42
3
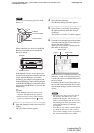
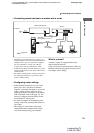
Select [Internet Connection].
The [Internet Connection] window appears.
4
Select the [Settings] button to the right of
[LAN (PPPoE)].
The [LAN (PPPoE)] window appears.
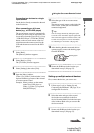
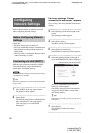
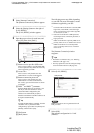
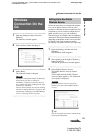
5
Input the proper values for each item, and
select [Set], then select [Back].
1 Internet service provider (ISP) name
This is used to identify your ISP. Most ISPs
do not require this entry. Enter the name only
when required by your ISP.
2 Access ID
*1
This is used to verify that the user has
authorization to connect to the Internet.
3 Internet connection password
*2
This is used to verify that the user has
authorization to connect to the Internet.
For security, password characters are shown
as asterisks.
4 DNS1
*3
and DNS2
*4
parameters
Enter the DNS addresses specified by your
ISP. If you select the check box next to
[Automatic DNS configuration], the
addresses are automatically acquired.
Note that some ISPs do not allow addresses to
be acquired automatically.
z Tip
To input the DNS address manually, clear the
check box next to [Automatic DNS
configuration], input values for [DNS1] and
[DNS2], and then select [Set].
5 [Set] button
6 [Back] button
The following terms may differ depending
on your ISP. For more information, see the
documents supplied by your ISP.
*1
Connection ID is also known as user ID, PPP
login name, network ID, connection login
name, account name, logon name, login ID,
or connection account.
*2
Password is also known as PPP password,
network password, connection password, or
login password.
*3
DNS1 is also known as primary DNS server,
primary name server, or domain name server.
*4
DNS2 is also known as secondary DNS
server, secondary name server, or domain
name server.
The [Internet Connection] window
reappears.
z Tips
• For details on character entry, see “Entering
Characters” (1 page 116).
• You may capture and save the configured setup
screen for future reference (1 page 70).
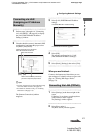
6
Select [LAN (PPPoE)].
A confirmation window appears.
Note
PPPoE connections are not guaranteed for all
DSL providers.
7
Select [OK].
This sets the configuration for “LAN
(PPPoE)”.
LAN (PPPoE)