


Copying and back-up
08
70
En
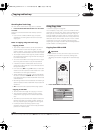
Copying from DVD to HDD
Important
• The DVD to HDD Copy screen isn’t accessible when
a finalized Video mode disc is loaded. However, you
can still use the One Touch Copy function (See
One
Touch Copy
on page 66).
• The recorder can only store one Copy List at a time.
• The Copy List will be erased if:
– any of the titles on the DVD disc are erased or
edited.
– the disc tray is opened.
– playback is switched between Play List and
Original.
– the DVD disc is re-initialized or finalized.
– the recorder is reset to its factory settings (see
Resetting the recorder
on page 98).
• It may not be possible to copy from a DVD disc that
was recorded on a different DVD recorder or a PC.
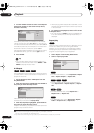
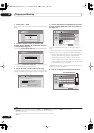
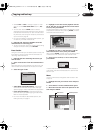
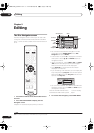
1 Press HOME MENU and select ‘Copy’.
2 Select ‘DVD/CD
HDD’.
3 If there is already a Copy List stored in the
recorder, choose whether to ‘Create New Copy List’
or ‘Use Existing Copy List’.
• Selecting
Create New Copy List
will erase any Copy
List already stored in the recorder.
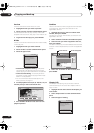
4 Use the
/
buttons to highlight titles you want
to copy, pressing ENTER after each one to add it to
the Copy List.
Titles you’ve added to the Copy List are highlighted in
pink.
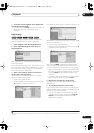
5 Press
to display the command menu panel.
6 Select ‘Next’ to move on to the Title Edit screen.
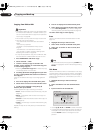
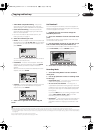
7 To edit a title, highlight it using the
/
buttons, then press ENTER.
A menu appears of Copy List editing commands:
•
Erase
– Erase individual titles from the Copy List (see
page 70).
•
Move
– Change the order of titles in the Copy List
(see page 71).
•
Preview
– Check the content of a title in the Copy List
(see page 72).
•
Cancel
– Exit the Copy List screen without saving any
changes.
Repeat this step for as many titles you have that need
editing.
8 Press
to display the command menu panel.
9 Select ‘Next’ to proceed to the Start Copy screen.
• Select
Recording Mode
if you want to change the
recording quality (see
Recording Mode
on page 73).
10 Select ‘Start Copy’ to start copying.
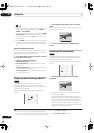
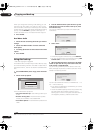
Erase
Use this command to erase individual titles from the
Copy List.
1 Highlight the title you want to erase.
2 Select ‘Erase’ from the command menu panel.
3 Select ‘Yes’ to confirm or ‘No’ to cancel, then
press ENTER.
Tip
• You can erase a title quickly by pressing
CLEAR
when
the title is highlighted. Confirm the edit by pressing
ENTER
.
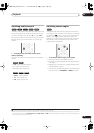
Title Name
Use this command to name or rename titles in the Copy
List (the names of the original titles remain unchanged).
When copying to a Video mode disc, the name length is
limited to 40 characters; for a VR mode disc, the limit is
64 characters.
1 Highlight the title you want to name (or
rename).
2 Select ‘Title Name’ from the command menu
panel.
3 Input a name for the selected title.
• Use the
///
and
ENTER
to select characters.
•A name generated automatically by the recorder will
already be in the name input section of the screen.
Use the
/
buttons to change the cursor
position.
Yes
Erase ?
No
!
Input Title Name
CAPS
small
OK Clear Space
A B C D E F G H I J K L M . , ? !
N
O
P
Q
R S T U V W X Y Z ( ) : ;
A A A A A A
Æ
ç
E E E E I I I I #
2
3
´
µ ¶ ·
1
¿
`
D
N
O
O
O
O
O
ø
U U U U Y ß $
%
0 1 2 3 4 5 6 7 8 9
<
=
>
_
&
£ \ § ¨ © ¬ – ®
_
˚
+ – / @ [ ¥ ] ˆ ÷ x ± { | }
~
¡
c
a
–
o
–
<<
<<
1
/4
1
/2
3
/4
¸
11/04Wed 12:30PM 2ch LP
DVR-530H_KU.book 70 ページ 2005年6月8日 水曜日 午前11時16分