


14
Chapter 3, Installing Your Matrox MXO Software and Configuring Your System
Installing your Matrox MXO software
If you are planning on using MXO in Mastering mode for video editing, you
should install Final Cut Pro before installing the MXO software. For information
on installing Final Cut Pro, see your Final Cut Pro User’s Manual.
1 Insert your Matrox MXO installation CD in your DVD-ROM drive and run
the installation program on the CD.
2 Follow the onscreen instructions to install the Matrox MXO software on
your computer.
3 The installer will restart your computer at the end of the installation when
you click
Restart.
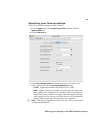
Removing your Matrox MXO software
1 In the Finder menu, choose File > New Finder Window.
2 Choose Applications > Matrox MXO Utilities > MXO Uninstaller.
3 Enter your administrator password in the Authenticate dialog box, then
click
OK.
¡ Important The uninstall will not work unless you enter the correct
administrator password.
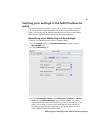
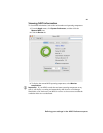
Calibrating your secondary display
For accurate and consistent color, it’s recommended that you use the ColorSync
utility that comes with your Mac, or a hardware calibration system to calibrate
the DVI monitor that you’ve connected as your secondary display for use with
Matrox MXO.
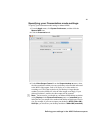
¡ Important Unless you have a secondary display monitor connected to the DVI
OUT of the MXO, do not drag your menu bar off your primary display monitor
in the
Arrangement dialog box, as you will not be able to get the menu bar back.