


51
GB
3
3.2 Basic Setup
3.2.1 Video Setup
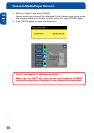
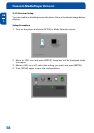
This chapter shows you how to setup the video output of the player. You have
to setup the player's video output mode to correspond to the video input mode
of your TV.
When you do not see a normal screen after connecting video
cable, check the following:
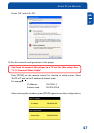
1. "TV "– Switch to Video Input Mode: Turn on TV, and switch to
video input mode same as video connection. See TV user
manual.
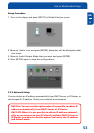
2. "Player" – Switch to Video Output Mode: Press [VIDEO] button
repeatedly. Whenever [VIDEO] is pressed, the video output
signal is changed.
3. After you see normal screen, you have to save video configu-
rations of the player.
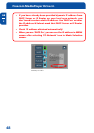
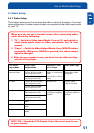
TTV Video
Input Mode
Normal Video
S-Video
Component 480i
Component 480p
Component 720p
Component 1080i
Player Video
Output Mode
TV Out: NTSC C/S-Video
(HD Component OFF)
TV Out: PAL C/S-Video
(HD Component OFF)
TV Out: NTSC C/S-Video
(HD Component OFF)
TV Out: PAL C/S-Video
(HD Component OFF)
TV Out: NTSC C/YPbPr
(HD Component OFF)
TV Out: PAL C/YPbPr
(HD Component OFF)
HD Component Out On
480p
HD Component Out On
720p
HD Component Out On
1080i
Connection Jack
of TV, Player
CVBS or Composite
Jack
(Generally Yellow
Jack)
S-Video Jack
Component 3 Jack
* Y(Green), Pb(Blue),
Pr(Red)
Video Cable Type
Yellow RCA Cable
(Supplied)
S-Video Cable
* Black rounded
Component Cable
* Y(Green), Pb(Blue),
Pr(Red)
NTSC, PAL : Standard of TV Output. Select the corret one for use
in your country.
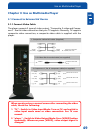
Use as Multimedia Player