


| DLO HOMEDOCK HD USER MANUAL
8
| 9
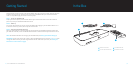
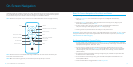
Connecting HomeDock HD Using an S-Video Cable
Plug the included AC Power Adapter into the back of the HomeDock HD Base, and the other end into 1.
any available AC power outlet. Plugging in your HomeDock HD will turn it on and start the boot-up
process, which may take a few minutes.
Plug an S-Video cable (available separately) into the back of the HomeDock HD Base. 2.
Connect the other end of the S-Video cable to the corresponding S-Video input on your TV. 3.
Plug the appropriate audio cable (available separately) into either the Digital Audio Output or RCA 4.
Audio Outputs on the back of the HomeDock HD Base.
Connect the audio cable to the corresponding input on your TV or home stereo. Be sure to note which 5.
inputs you are using.
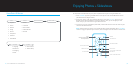
Connecting HomeDock HD Using the Included AV Cable
Plug the included AC Power Adapter into the back of the HomeDock HD Base, and the other end into 1.
any available AC power outlet. Plugging in your HomeDock HD will turn it on and start the boot-up
process, which may take a few minutes.
Plug the included AV Cable into the Composite Video Output and RCA Audio Outputs on the back of the 2.
HomeDock HD Base. Be sure to match the colors of the cable to the color of the corresponding jack
(yellow = video, white = audio left, red = audio right).
Connect the AV Cable to the corresponding RCA inputs on your TV or home stereo. Be sure to note 3.
which inputs you are using.
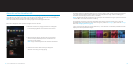
Turn on your TV and/or home stereo and then select the correct input(s) for HomeDock HD. At this 4.
time, you’ll see a screen on your TV with a DLO logo and a small box of moving squares until your
HomeDock HD has finished booting up. Once complete, a “No iPod Connected” screen will appear.
Dock your iPod, allowing it to pivot back and rest securely against the HomeDock HD support stand. 5.
Once your iPod has initialized, use the included RF Remote Control to browse and select your iPod
content on TV. See On-Screen Navigation [pg.10].
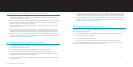
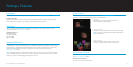
Viewing the Video Content of your iPod touch
If you have not yet updated your iPod touch firmware to version 2.1 or later, you will need to change the
Auto-Lock setting to Never in order to enjoy video content from your iPod touch on your HomeDock HD.
To do so, please follow these steps:
Before docking your iPod to your HomeDock HD, enter the Settings Menu on your iPod touch.1.
In the Settings Menu, select General.2.
In the General Menu, select Auto-Lock.3.
Set Auto-Lock to 4. Never, then dock your iPod touch to enjoy video with your HomeDock HD.
NOTE: If you have updated your iPod touch firmware to version 2.1 or later, unlocking is not required.
Unlocking is only necessary for iPod touch with versions prior to 2.1.
Turn on your TV and/or home stereo and then select the correct input(s) for HomeDock HD. At this 6.
time, you’ll see a screen on your TV with a DLO logo and a small box of moving squares until your
HomeDock HD has finished booting up. Once complete, a “No iPod Connected” screen will appear.
Dock your iPod, allowing it to pivot back and rest securely against the HomeDock HD support stand. 7.
Once your iPod has initialized, use the included RF Remote Control to browse and select your iPod
content on TV. See On-Screen Navigation [pg.10].