


| DLO HOMEDOCK HD USER MANUAL
6
| 7
Your HomeDock HD is ready to use right out of the box with the included AV Cables.
For the best high-definition performance, we recommend you connect HomeDock HD to your TV using an
HDMI cable (available separately). If you do not have an HDMI-capable television or Home Entertainment
Center, there are several optional ways you can connect HomeDock HD:
Connect to your TV using S-Video or RCA connections (AV Cable included).•
Connect to an AV receiver using S-Video, RCA, or HDMI connections.•
Connect to your home stereo or powered speakers without using a TV. See • Using HomeDock HD
with External Speakers [pg.18]
NOTE: Remove the thin plastic strip on the back of the included RF Remote Control to engage the battery.
IMPORTANT: On your iPod, ensure that “TV Out” under iPod Video Settings is set to either Ask or On in order
to enjoy the video content of your iPod using HomeDock HD. For iPod touch in particular, see Viewing the
Video Content of Your iPod touch [pg.9].
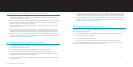
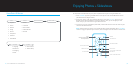
Connecting HomeDock HD Using an HDMI Cable
Plug the included AC Power Adapter into the back of the HomeDock HD Base, and the other end into 1.
any available AC power outlet. Plugging in your HomeDock HD will turn it on and start the boot-up
process, which may take a few minutes.
Plug an HDMI cable (available separately) into the back of the HomeDock HD base. 2.
Either connect the HDMI cable to any available HDMI input on your TV, or connect the HDMI cable to 3.
your HDMI-compatible stereo receiver.
NOTE: Connecting HomeDock HD via HDMI directly to your TV will route both video and audio
through the TV. In order to enjoy the audio over your home stereo system, connect HomeDock HD
to your HDMI-compatible stereo receiver, then connect your receiver to your TV via HDMI. You may
also choose to connect HomeDock HD to your TV via HDMI, then to your stereo receiver via the Digital
Audio Output (appropriate cables available separately).
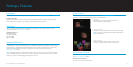
Turn on your TV and/or home stereo and select the correct input(s) for HomeDock HD. At this time, 4.
you’ll see a screen on your TV with a DLO logo and a small box of moving squares until your
HomeDock HD has finished booting up. Once complete, a “No iPod Connected” screen will appear.
Dock your iPod, allowing it to pivot back and rest securely against the HomeDock HD support stand. 5.
Once your iPod has initialized, use the included RF Remote Control to browse and select your iPod
content on TV. See On-Screen Navigation [pg.10].
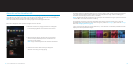
IMPORTANT: In order to maximize the performance of your HomeDock HD when using an HDMI cable, you
must first change the video resolution of HomeDock HD from Standard Definition to High Definition. To do so,
please follow these steps:
With your iPod docked, select Settings in the HomeDock HD Main Menu.1.
In the Settings Menu, select Resolution.2.
Change the selection from Standard Definition (PAL or NTSC) to High Definition (720p or 1080i).3.
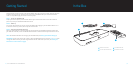
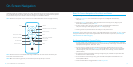
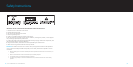
HomeDock HD Connections
HOMEDOCK HD
Setting Up HomeDock HD
1
1
4
7
2
5
8
3
6
2 3
4 5 7 86
DIGITAL AUDIO OUTPUT [OPTICAL]
USB CONNECTION
HDMI OUTPUT
S-VIDEO OUTPUT
COMPOSITE VIDEO OUTPUT
RCA AUDIO OUTPUTS
AUXILIARY AUDIO INPUT
AC POWER INPUT