


16
GB
Getting Started – BASIC –
Note
• When the wireless kit WAHT-SD1 (supplied
with DAV-HDX267W only) is installed,
[STANDARD (WIRELESS)] appears instead.
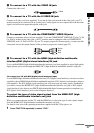
10 Press .
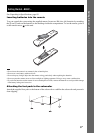
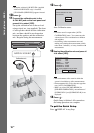
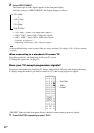
11 Connect the calibration mic to the
A.CAL MIC jack on the front panel and
press X/x to select [YES].
Set up the calibration mic at the ear level
using a tripod, etc. (not supplied). The front
of each speaker should face the calibration
mic, and there should be no obstruction
between the speakers and the calibration
mic. Be quiet during the measurement.
12 Press .
Auto Calibration starts.
Note
•Loud test sound is output when [AUTO
CALIBRATION] starts. You cannot turn the
volume down. Give consideration to children
and neighbor.
•Avoid being in the measurement area and
making noise during the measurement (which
takes about 3 minutes), as it may interfere with
measurement.
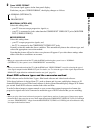
13 Unplug the calibration mic and press C/
c to select [YES].
Note
•The environment of the room in which the
system is installed may affect measurements.
•If measurement fails, follow the message then
retry [AUTO CALIBRATION].
•When you select [SECOND ROOM] for
[SPEAKER FORMATION], measurement of
[SURROUND L] and [SURROUND R] is not
displayed.
14 Press .
Quick Setup is finished. All connections
and setup operations are complete.
To quit the Quick Setup
Press DISPLAY in any Step.
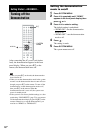
AUDIO IN / A.CAL MIC
Calibration mic
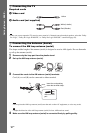
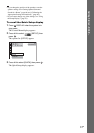
Connect calibration mic. Start
measurement?
YES
AUTO CALIBRATION
NO
FRONT L :
FRONT R :
CENTER :
SUBWOOFER :
SURROUND L :
SURROUND R :
If OK, unplug calibration mic and select
“YES”.
YES
YES
YES
NONE
YES
NONE
NONE
Measurement complete.
NO