12/3/17 HF401PH_OM_EN.fm
E-9
Wi-Fi network Setup for AirPlay / DLNA (continued)
Notes:
● For DLNA compatible devices, the function control may
vary depending on DLNA application used.
● To enable this unit to control iTunes software, the
setting below is required.
On:
Network Stand-by mode is enable.
During stand-by mode, if select XL-HF401PH speakers through AirPlay
icon and tap/click PLAY on AirPlay device, the unit will automatically power
on and stream the music from your AirPlay device.
To enable the Network Stand-by mode :
During Stand-by mode, press DEMO/DIMMER button on remote
control to select the Network Stand-by mode on or off.
To check the IP address of the router / Mac ID / SSID:
1 Press iPod MENU button on the remote control.
2 Press / button on the remote control repeatedly.
The display will toggle as below:
Listening to the iPod, iPhone or iPad
Made for:
Caution:
Please update your iPod, iPhone and iPad unit to the latest
software version before using it. Please visit Apple’s homepage to
download the latest version for your iPod, iPhone and iPad.
Notes:
●
Charging terminal for iPod, iPhone and iPad:
●
The message “This accessory is not made to work with iPhone” or
similar, may appear on the iPhone screen when:
- battery is low.
- the iPhone is not properly docked (eg. slanting).
If this occurs, remove and re-dock the iPhone.
●
This product is made for iPod, iPhone and iPad. To prevent
random interference when iPod, iPhone or iPad is
connected, the headphone output of the main unit is
disabled, and “HP INVALID” will be displayed.
You may also experience brief audio interference during
incoming calls.
●
The headphone output of the main unit is switched off during inserting
iPod, iPhone and iPad unit. This is an Apple product specification.
Note:
USB terminal does not support VIDEO out.
1
Press the ON/STAND-BY button to turn the power on.
2
Press the USB button on the remote control or FUNCTION button
repeatedly on the main unit to select USB function.
3
Connect iPod, iPhone or iPad to the unit. “USB/iPod” will appear.
4 Press
the /
(CD/USB
/ ) button to start playback.
Note:
S
top button ( ) is invalid during iPod, iPhone or iPad playback.
●
Sound will only switch from iPhone to the main unit after
authentication process is completed in approximately 10
seconds.
●
Incoming calls will pause the playback.
●
Once the calls are answered, the conversation can only be
heard through the built-in iPhone speaker. Turn on the iPhone
speaker or undock the iPhone to start conversation.
For Mac iTunes:
1
On the toolbar menu, click
iTunes
and select
Preferences
.
2
Under
Devices
tab, check the
‘ Allow iTunes audio control
from remote control speakers’
box.
For Windows iTunes:
1
On the toolbar menu, click
Edit
and select
Preferences.
2
Under
Devices
tab, check the
‘
Allow iTunes control from
remote control speakers’
box.
■ Network Stand-by mode
●
iPod touch (4
th
generation)
●
iPod touch (3
rd
generation)
●
iPod touch (2
nd
generation)
●
iPod touch (1
st
generation)
●
iPod classic
●
iPod nano (6
th
generation)
●
iPod nano (5
th
generation)
●
iPod nano (4
th
generation)
●
iPod nano (3
rd
generation)
●
iPod nano (2
nd
generation)
●
iPhone 4S
●
iPhone 4
●
iPhone 3GS
●
iPhone 3G
●
iPhone
●
iPad 2
●
iPad
Condition DOCK USB terminal
USB function YES YES
(without iPod
or iPhone docking)
Other function
(iPod / CD / Network /
Tuner / Audio In / Line
In)
YES NO
Stand-by YES NO
Wi-Fi Setup
Mac ID
SSID
(when using
router)
IP address
■
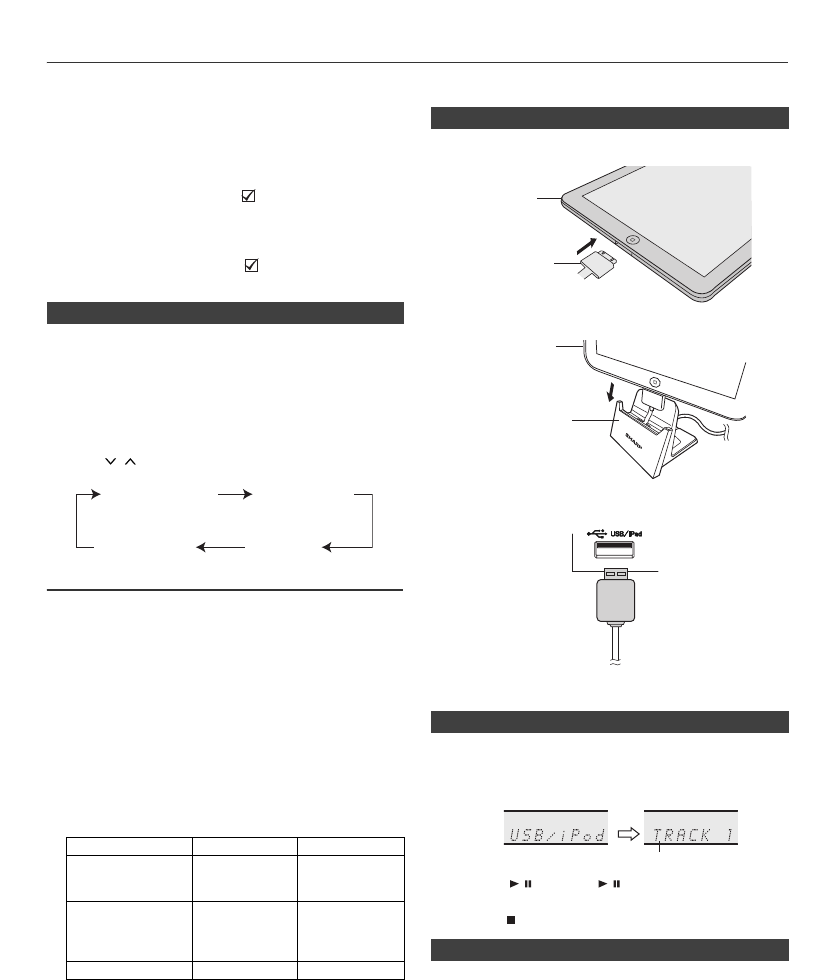
iPod, iPhone and iPad connection via USB terminal
1 Insert the connector to the iPod, iPhone or iPad.
2 Place the iPad to the stand for iPad.
3 Connect the iPod, iPhone or iPad to the unit via USB
connector.
■
iPod, iPhone or iPad playback via USB terminal
■ iPhone playback
iPad
Connector
iPad
Stand for iPad
File name


