12/3/17 HF401PH_OM_EN.fm
E-7
Setting the clock (Remote control only)
(continued)
To confirm the time display:
Press the CLOCK/TIMER button. The time display will
appear for about 5 seconds.
Note:
When power supply is restored after unit is plugged in again or
after a power failure, reset the clock (pages 6 - 7).
To readjust the clock:
Perform “Setting the clock” from step 1. If the “Clock” does not
appear in step 2, step 4 (for selecting the 24-hour or 12-hour
display) will be skipped.
To change the 24-hour or 12-hour display:
Wi-Fi network Setup for AirPlay / DLNA
(AirPlay)
With Apple AirPlay technology, you can stream your music from your
iTunes on a Mac, PC, iPod touch, iPhone, or iPad to external
speakers (XL-HF401PH) via a Wi-Fi network.
AirPlay usage requires:
●
MacBook or MacBook Pro running MacOS 10.6.6 or greater.
●
iTunes 10.2 or greater (Mac/PC).
●
iOS 4.3 or later
- iPod touch (4th, 3rd and 2nd generation)
- iPhone 4S
- iPhone 4
- iPhone 3GS (iPhone 3G cannot support AirPlay)
- iPad 2
- iPad
(DLNA)
DLNA technology enables you to share media from one device to
another via a Wi-Fi network.
DLNA usage requires:
●
DLNA compatible devices with appropriate application. (Refer to
your devices’ manual) Support status varies depending on model
and software features such as client and server functions.
●
PC with Windows 7.
●
DLNA version 1.5
●
This product supports audio source with playback capability only.
Streaming (audio and video) from DLNA devices is not supported
by this product.
●
DRM file playback (DTCP-IP) is not supported.
●
SHARP does not guarantee that this product will work with all
DLNA compatible devices and wireless LAN routers.
Note:
When this unit is placed too near a Wireless LAN device or
microwave, noise interference may occur, causing crackling sound. It
may also reduce the communication speed and cause invalid
connection. If these happen, do the following:
- Place the unit away from the Wireless LAN device or microwave.
- Place the unit closer to the source device.
1 Press the ON/STAND-BY button.
2 Press the NETWORK button.
3
Press the iPod MENU button on the remote control.
4 Press the / button to select ‘Wi-Fi Setup’.
Press the ENTER button.
5
Press the
/
button to select
‘Direct’
. Press the ENTER
button. Wait until the display shows
‘
Direct Ready
’
which
take about 40 seconds.
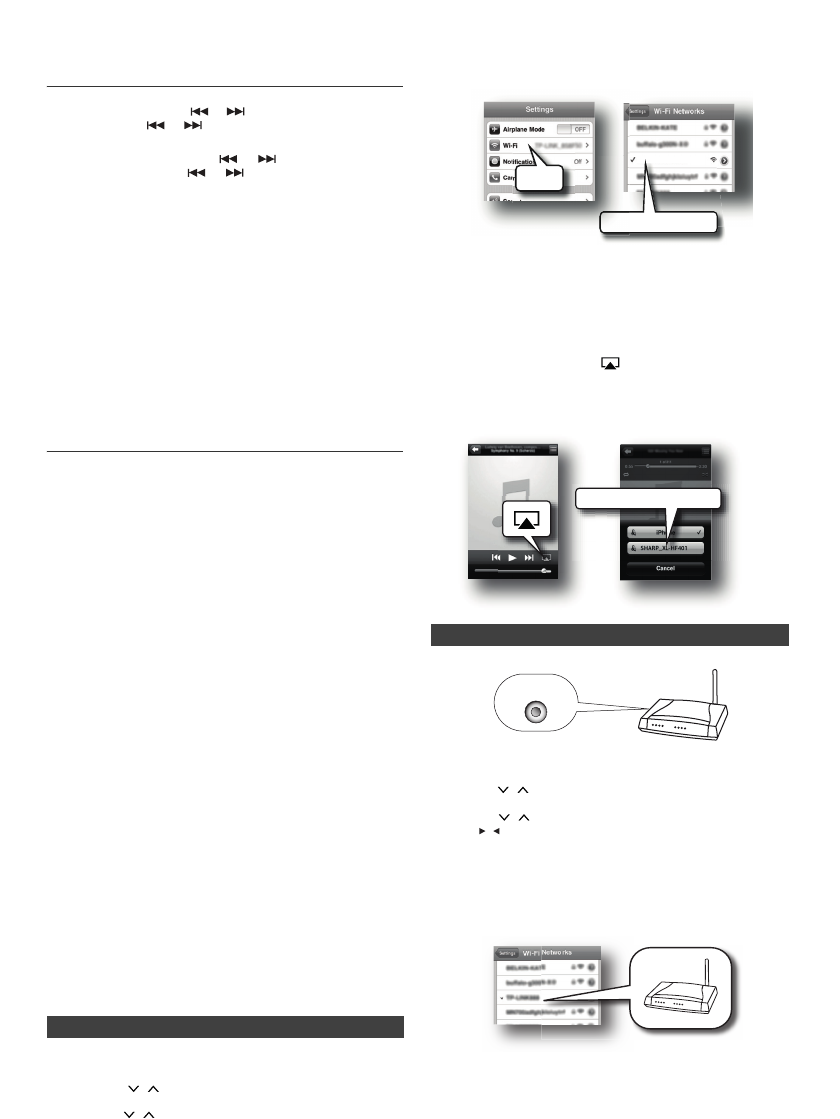
6 On the iPod touch/iPhone/iPad, select ‘Settings’ -->
‘Wi-Fi’. On the PC/Mac, enter the list of available
wireless networks.
For other DLNA compatible devices, turn on the Wi-Fi. For more details,
refer to your devices’ manual.
7
Select
SHARP_XL-HF401
from the list of available networks.
8
Launch
Music
and play desired song on your iPod touch / iPhone or
iPad. For PC/Mac, launch
iTunes
.
For other DLNA compatible devices, launch the DLNA compatible
media software. For more details, refer to your devices’ manual.
9
Tap / click on the
AirPlay
icon .
Select the speaker :
SHARP_XL-HF401_xxxxxx
.
Sound will be heard from the XL-HF401 speakers via audio
streaming.
1
Press the WPS button on the wireless router
.
2
Press the ON/STAND-BY button.
3
Press the NETWORK button.
4
Press the iPod MENU button on the remote control.
5
Press the
/
button to select
‘Wi-Fi Setup’
.
Press the ENTER button.
6
Press the
/
button to select
‘WPS’
. Press the ENTER button. Wait
until ‘ ’ on the display stop blinking
and the display shows
"Successfully Connected to [network name]".
7
On the iPod touch/iPhone/iPad, select
‘Settings’
-->
‘Wi-Fi’
. On the PC/
Mac, enter the list of available wireless networks. For other
DLNA
compatible devices
, turn on the Wi-Fi. For more details, refer to your
devices’ manual.
8
Select your router from the list of available networks. Enter your network
password if required.
9 Continue with step 8 to 9 in ‘Direct wireless connection’
on this page.
Note:
WPS process (network search) takes about 2 minutes. If
fail to connect, the display will show
‘
Cannot connect to
Network. Please try again
’
. Repeat step 4 to retry.
5
To adjust the hour, press the or button and then press the ENTER
button. Press the or button once to advance the time by 1 hour.
Hold it down to advance continuously.
6
To adjust the minutes, press the or button and then press the
ENTER button. Press the or button once to advance the time
by 1 minute. Hold it down to advance the time by 5 minutes interval.
1 Clear all the programmed contents. [Refer to “Factory
reset, clearing all memory” on page 23 for details.]
2 Perform “Setting the clock” from step 1 onwards.
■ Direct wireless connection
Note: The last 6 digits ‘xxxxxx’ is MAC ID.
■ Connection via wireless router with WPS
SHARP_XL-HF401
S
SHA
Wi-Fi
SHARP_XL-HF401
SHARP_XL-HF401_xxxxxx
WPS


