Controls and displays
03
21
En
Chapter 3
Controls and displays
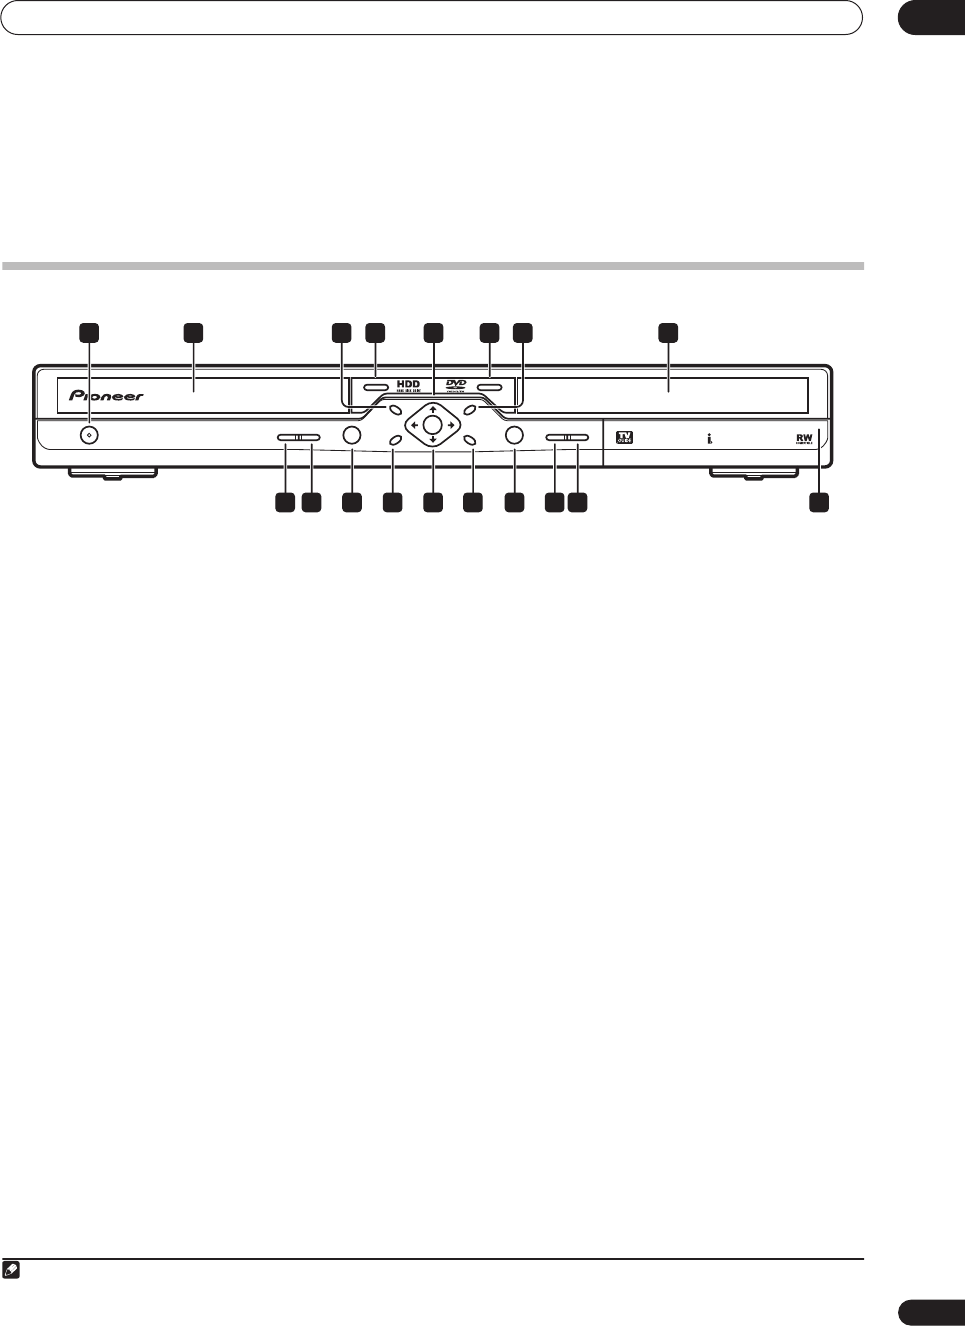
Front panel
1
STANDBY/ON
Press to switch the recorder on/into standby.
2 Disc tray
3 DISC NAVIGATOR/TOP MENU
Press to display the Disc Navigator screen, or the top
menu if a DVD-Video disc is loaded.
4
OPEN/CLOSE
Press to open/close the disc tray.
5 HDD/DVD indicator
Lights blue when the HDD is selected; orange when DVD
is selected.
6 HDD/DVD
Press to switch between the hard disk drive (HDD) and
DVD for recording and playback.
7 MENU
Press to display a DVD-Video disc menu.
8 Front panel display and IR remote sensor
See
Display
on page 24 for details.
9 Front panel inputs
(page 14)
Pull the cover down where indicated to access the front
panel input jacks (audio, video and DV
1
). Especially
convenient for connecting camcorders and other
portable equipment.
10 ONE TOUCH COPY
(page 66)
Press to start One Touch Copy of the currently playing
title to DVD or the HDD. See also the
Note on copying
on
page 9.
11
Press to stop recording.
12
ì
REC
Press to start recording. Press repeatedly to set the
recording time in 30 minute blocks.
13 RETURN
Press to go back one level in the on-screen menu or
display.
14
///
and ENTER
Used to navigate all on-screen displays. Press
ENTER
to
select the currently highlighted option.
When stopped, the
/
buttons can also be used to
change the TV channel.
15 HOME MENU
(page 32)
Press to display the Home Menu, from which you can
navigate all the functions of the recorder.
16
Press to start or restart playback.
17
Press to pause or resume playback.
18
Press to stop playback.
HDD/DVD
MENU
TOP MENU
RETURN
ENTER
HOME
MENU
ONE TOUCH
COPY
OPEN/CLOSE
PULL - OPEN
ì
REC
STANDBY/ON
4 53 71 2 6 8
18 17 16 15 14 13 12 11 10 9
Note
1.DV input on DVR-633/533H-S only
DVR-530H_KU.book 21 ページ 2005年6月8日 水曜日 午前11時16分
