


6 C637M-B (10/03)
FRONT VIEW
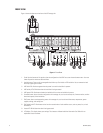
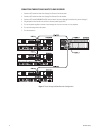
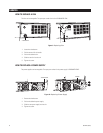
Figure 1 shows the features on the front of the IDE storage unit.
Figure 1. Front View
1. Panel: Use the features of this panel to view the configuration of the RAID or to enter the environment menu. You must
lower this panel to remove or add hard drives.
2. Hard drive trays: There are 14 hot-swappable hard drive trays. Each holds an IDE hard drive. You can remove the hard
drive tray by pulling on the lever.
3. HDD fault LEDs: Illuminate green when the power is on and the hard drive is present.
4. HDD activity LEDs: Blink blue when the hard drive is being accessed.
5. HDD power LEDs: Illuminate red when the hard drive fails or when no hard drive is present.
6. Controller button: Use to view the configuration of the storage unit, such as the memory size, firmware version, and the
brand and capacity of the hard drives.
7. ENC button: Use to see the operating status of the storage unit, such as the hard drive status, temperature, power
supplies, voltage, and cooling fans.
8. ENC global fault LED: Illuminates red and an alarm sounds when a fault condition occurs, such as power, fan, or hard
drive failure.
9. Access LED: Blinks blue when data is being processed.
10. LCD display: This display shows your settings. The characters indicate hard drive information. See Table A for an
explanation of each character.
EXIT
POWER
ENG
CTRL
1
C-F
oo
ENC
CTRL
1
EXIT
C-F
oo
POWER
ᕫᕹ
ᕫᕺ
ᕫᕻ
ᕫᕼ
ᕫᕽᕫᕸᕫᕷᕫᕶᕫᕵᕩ
ᕨ
ᕧᕦ
ᕢ
ᕡ
ᕤ
ᕣᕥ
ᕫᕾ