


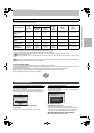


33
RQT8415
Recording broadcasts from an external equipment
[HDD] [RAM] [-R] [-RW‹V›] [+R] [+RW]
To make a timer recording with your television, connect to a
television with a Q Link function (➡ 59) that you can use for setting
timer recordings using a fully wired 21-pin Scart cable (➡ 14).
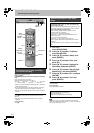
1 Make timer programming on the TV.
2 Press [DRIVE SELECT] to select the
HDD or DVD drive.
If you selected the DVD drive, insert a disc (➡ 24).
3 Turn off this unit.
The start and end of recording is controlled by the TV.
To stop recording
Press [
∫
].
[Note]
≥When this unit is in timer recording standby or EXT LINK standby
(“F” or “EXT-L” is shown on the unit’s display), recording from
television does not start.
≥Programmes are recorded as one title on this unit when the end
time of the earlier timer recording and the start time of the later
timer recording are close to each other.
[HDD] [RAM] To divide the titles, go to “Divide Title” (➡ 45).
Preparation
≥Connect a digital/satellite receiver or decoder to this unit’s input
terminals (➡ 15).
≥When the output signal from the external equipment is NTSC,
change the “TV System” to “NTSC” in the Setup menu (➡ 70).
This unit cannot record to discs containing both PAL and NTSC
signals. (However, both types of programmes can be recorded
onto the HDD.)
≥Press [DRIVE SELECT] to select the HDD or DVD drive.
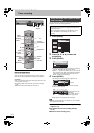
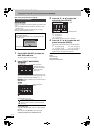
1 While stopped
Press [INPUT SELECT] to select the
input channel for the equipment you
have connected.
e.g.,If you have connected to AV2 input terminals, select “AV2”.
2 Press [REC MODE] to select the
recording mode.
3 Select the channel on the other
equipment.
4 Press [¥ REC].
Recording starts.
To skip unwanted parts
Press [;] to pause recording. (Press again to restart recording.)
To stop recording
Press [∫].
To record programmes from digital/satellite receiver using timer
programming
Preparation
≥Make sure you connect the AV2 input terminal of this unit to the
Scart terminal of a VCR or a digital/satellite receiver with a 21-pin
Scart cable (➡ 15).
≥Set “AV2 Input” to match the connected equipment in the Setup
menu (➡ 68).
≥Set the “Ext Link” to match the connected equipment in the Setup
menu (➡ 68.)
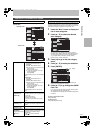
1 Make timer programming on the
external equipment.
2 Press [DRIVE SELECT] to select the
HDD or DVD drive.
If you selected the DVD drive, insert a disc (➡ 24).
3 Press [EXT LINK].
The unit turns off and “EXT-L” lights on the unit’s display to
indicate timer recording standby has been activated.
To cancel the external control
Press [EXT LINK] to stop recording or to cancel linked timer
recording standby.
≥In order to prevent accidental operation, press [EXT LINK] to
cancel the setting after recording is finished.
[Note]
≥This function does not work with some equipment. Refer to the
equipment’s operating instructions.
≥The beginnings of recordings may not be recorded correctly in
some cases.
≥When “Ext Link” is set to “Ext Link 2”, this function does not work if
the input signal is NTSC system.
≥When “AV2 Connection” is set to “Decoder”, EXT LINK is not
available (➡ 68).
≥Programmes are recorded as one title on this unit when the end
time of the earlier timer recording and the start time of the later
timer recording are close to each other.
[HDD] [RAM] To divide the titles, go to “Divide Title” (➡ 45).
≥When this unit is in EXT LINK standby (“EXT-L” is shown on the
unit’s display), The GUIDE Plus+ data cannot downloaded.
≥While the unit is in EXT LINK standby mode or recording, video
picture is from the AV2 input terminal irrespective of “AV1 Output”
setting (➡ 68).
≥During EXT LINK standby mode or recording, playback is only
available from the drive performing the recording.
See also “Important notes for recording” (➡ 8).
Making timer recordings on the
television
(e.g., of digital broadcasts)
Recording from digital/satellite receiver
or decoder
Linked timer recordings with external
equipment (digital/satellite receiver) —
EXT LINK
Timer recording/Recording broadcasts from an external equipment
EH55.book Page 33 Thursday, January 19, 2006 1:58 PM