19
3. Through the 2 screw holes of the bracket mark the mounting surface
with a pencil.
4. Where marked, start the screw holes using the provided screws.
5. Remove screws from the mounting surface.
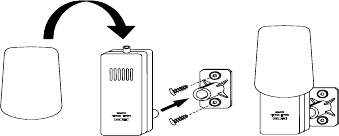
6. Align the mounting bracket with the started screw holes.
7. Screw mounting bracket onto the mounting surface. The screws should
be flush with the bracket.
8. Fit the mounting post (on the back of the remote thermo/hygro sensor)
into the receptor of the mounting bracket.
B. Mounting With Adhesive Tape
1. With a nonabrasive solution, clean and dry the back of the mounting
bracket and the mounting surface to ensure a secure hold. The
mounting surface should be smooth and flat.
2. Remove the protective strip from one side of the tape. Press firmly
onto the designated area on the back of the mounting bracket.
3. Remove the protective strip from the other side of the tape, and situate
the mounting bracket. Firmly press the mounting bracket onto the
mounting surface.
4.
Fit the mounting post into the receptor of the mounting bracket.
II. The Indoor Weather Station
A. The indoor weather station can be mounted in two ways:
• with the table stand or,
• on the wall with the use of a wall hanging screw (not included).


