


40
COMPU LINK Remote Control System
The COMPU LINK remote control system allows you to
operate JVC’s audio components like this unit through the
remote sensor on a receiver (amplifier).
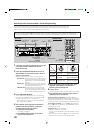
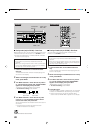
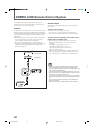
Connection
To use this remote control system, you need to connect JVC’s
audio components through the COMPU LINK-4 (SYNCHRO)
or COMPU LINK-3 (SYNCHRO) jacks (see below) in addition
to the connections using audio cables with RCA pin plugs
(see page 7).
• Make sure that the AC power cords of these components
are unplugged before connection. Plug the AC power
cords only after all connections are complete.
• When using COMPU LINK remote control system for
operating a receiver (amplifier) equipped with TAPE and/or
CDR jacks, set the MODE selector to the appropriate
position (see page 7).
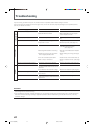
MD recorder etc.
Cassette deck
XL-R5020BK
CD3
CD2
CD1
MIX BALANCE
MIC
COMPU LINK – 4
(SYNCHRO)
MODE
TD
CDR
• There are four versions of COMPU LINK remote control system.
This unit is equipped with the fourth version—COMPU LINK-4
which has systematic operations with the CD recorder added to the
previous version—COMPU LINK-3.
• If your audio component has two COMPU LINK jacks, you can use
either one. If it has only one COMPU LINK jack, connect it so that it
is the last item in the series of components.
• You cannot use the number buttons on the remote control supplied
with a reciever (amplifier). Use the remote control supplied with this
unit.
• You cannot use synchronized recording by using COMPU LINK
remote control system.
• Refer also to the manuals supplied with your audio components.
Receiver
(amplifier)
Available functions
This remote control system allows you to use the functions
listed below.
Automatic source selection
This unit will turn on (or off) automatically:
—when you turn on (or off) the receiver (amplifier), and
—when you select TAPE or CDR on the receiver (amplifier).
Automatic power on/off (standby): only possible with the
COMPU LINK-3 and COMPU LINK-4
• When pressing the buttons listed below, the source is
changed to TAPE or CDR on the connected receiver
(amplifier):
—PLAY 3 for 3-CD Changer on the unit
—PLAY 3 for CD Recorder on the unit
—Disc number buttons (CD1, CD2 or CD3)
—3 on the remote control
• When this unit is selected (TAPE or CDR) as the source on
a receiver (amplifier), the currently selected disc on this
unit—3-CD Changer or CD Recorder—will start playing.
37-45.XL-R5020BK_f 02.5.28, 11:34 AM40