


25
STEP BY STEP CAPTURE
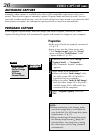
Use the Step by Step Capture mode when you want to:
•Capture images from a video source unit with no JLIP connector
•Capture images from video units with video output connectors
•Capture a small number of images
•Confirm the images being captured.
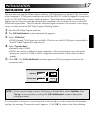
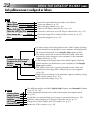
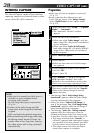
Set-up
Capture Mode
Image Format
Device Change
Initialize
ID Change
Counter Reset
Step by Step
Automatic
Preparation
•Make sure all units are properly connected
(
੬ p. 12).
•Click "Image Format" in "Set-up" and select
the desired format (
੬ p. 29).
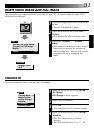
1
At the menu bar, click "Set-up" —
"Capture Mode" — "Step by Step".
•The Step by Step Mode is entered.
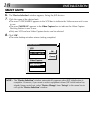
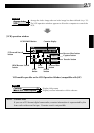
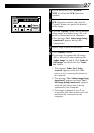
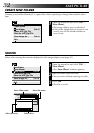
2
Click "CAPTURE" on the image you want
to capture.
•When a JLIP-compatible video source
unit is connected, you may use the
VCR Operation window. From the
menu, click "Window" and select
"VCR" to display the VCR Operation
window (
੬ p. 23).
•When you press the CAPTURE button,
the full image (640 x 480 pixels) is
captured into the Video Capture
module's memory. The index image
(80 x 60 pixels) is simultaneously
transferred to the computer.
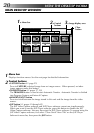
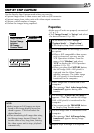
3
Index image data is transferred to the
computer.
•The message "No.1 index image being
transferred" appears during data
transfer.
4
The message "Transfer the full image ?"
appears. Click "Yes" and the full image
(640 x 480 pixels) is transferred to the
computer.
•You cannot use the TRANSFER button
in Step by Step Transfer mode.
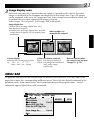
5
The full image data is transferred to the
computer.
•The message "No.1 full image being
transferred" appears during image
transfer.
6
Repeat steps 2 through 5 as required.
File Edit Set-up Window
TRANSFERCAPTURE
JLIP Video Capture
NOTE:
•Index images or Full images are trans-
ferred to the image display boxes bor-
dered in green. Click and select the
desired box(es).
•When transferring full image data using
the Bitmap image format (
9
.bmp), the
transfer takes a very long time, causing
the video source unit to stop playback
automatically.