


Consider VCR1 the recording VCR, and VCR2 (VT-F390A) the play-back
VCR. You will play a tape on VCR2 and record it on VCR1. To begin
copying:
Insert the videotape you wish to record in VCR2.
Insert a blank or erasable tape (with the safety tab intact) into VCR1.
Press AVX on VCR1 - the LINE indicator will display.
Press REC on VCR1, and press PLAY on VCR2.
To monitor the picture as you record, VCR1 must be connected to your TV
(follow instructions in the other VCR's manual). Press the VCR/TV button on
the remote. The VCR indicator will light on VCR1's display and you can view
the picture being recorded.
Putting The Record VCR in Pause
Some models of VCR will switch to the "STOP" mode if they are left in the
RECORD/PAUSE mode for more than five minutes. It is a good idea to not
leave your recording deck in RECORD/PAUSE for more than five minutes so
that this will not happen.
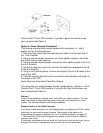
Copying Tapes From A Camcorder
If you would like to copy a video tape shot in your camcorder onto your VCR
here's how to do it.
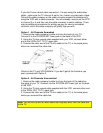
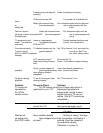
Connect the camcorder's AV output cable to your VCR. (see diagram
below)
Camcorder Hookup Illustration
Press the AVX button on the VCRs remote control so that the L2 (Line)
indicator appears in the VCR display.
Press REC/IRT on the VCR to start recording.
Press PLAY on your camcorder to start copying your tape.
Information on Audio Hookup
If your camcorder is only capable of monaural output (one audio jack)
connect it to the AUDIO IN L input on the front of the VCR.
VCR Care and Servicing
The VCR is fairly self-servicing, but you'll want to keep an eye on a few
things as you go. In addition, you may sometimes have troubles with your
VCR. We offer some suggestions for care to prevent problems, ways to
troubleshoot, and places to contact when you cannot solve the problems
yourself.