


TASCAM CD-RW901MKII 27
5 − Recording
Basic recording
1. Load a recordable disc into the unit. As the disc
loaded, the display shows TOC Reading, with the
period flashing.
2. Press the INPUT SELECT key to select a recording
source (see “Input selection” on page 26).
If a digital source is selected, and the connection
or the signal are improper, the error message D -IN
UNLOCK! will appear on the display.
3. Press the RECORD key. The unit enters record
ready mode, as shown by the REC and READY indica-
tors on the display.
NOTE
As the unit enters record ready mode, the display
shows Now OPC (Optimum Power Control) occasion-
ally, as the unit prepares to record on the disc.
To adjust the level of the source, following the
guidelines in “Input selection” on page 26.
NOTE
The red “OVER” indicators on the meters should never
light. Unlike analog equipment, digital audio units
pro-duce extremely unpleasant sounds when distort-
ed, and there is no “headroom” after the 0 mark. If
recording digitally from a commercially-produced
CD, the volume set in the menu should be 0 dB. This
will maintain all the dynamic range of the source CD
without clipping. Only boost the signal if the source is
exceptionally quiet.
An analog signal input at nominal level, with no cut
or boost from the volume controls, is equivalent to a
reading of −16 dB on the meters.
4. Press the PLAY key to start recording.
Pressing the PAUSE key stands by recording tempo-
rarily. To restart recording, press the PAUSE key or
PLAY key again.
5. Press the STOP key to stop recording.
When recording stops, the display shows
PMA Writing (Program Memory Area) flashing
for a few seconds as the unit writes to the disc.
NOTE
When PMA Writing is shown on the display, all keys
are ignored.
To confirm the total recording time, use the REC TIME
option in the SYSTEM sub-menu (see “Operation
basics” on page 16).
NOTE
Do not vibrate the unit or turn off the power when the
unit writes to the disc, otherwise, recording will fail.
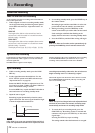
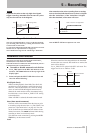
Full disc
If the disc becomes full during recording, the unit will
automatically insert a fade-out. For example: When recording
a long program, just before the end of the disc is reached, the
unit starts a fade-out over four seconds and the display will
show Fade Out.
When the fade-out has finished, the display shows Disc
Full!. Press the STOP key to exit.
If the disc is a CD-RW, the final track can be erased, if
required (see “Erasing” on page 34) and the disc then
finalized. If the disc is a CD-R, it must be finalized prior to use
(see “Finalizing” on page 33).
Time display while recording
When in record or record ready mode, repeated presses of the
TIME key cycle through four different time modes:
•
Elapsed track time (no display light indication)
•
Remaining track time (REMAIN is lit in the display)
•
Elapsed disc time (TOTAL is lit in the display)
•
Remaining disc time (TOTAL and REMAIN are lit in
the display)