


EN
4
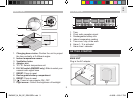
PROJECTION UNIT
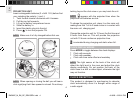
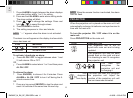
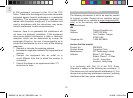
Insert rechargeable batteries (2 x AAA 1.5V) before first
use, matching the polarity (+ and -):
1. Twist the ball counter-clockwise until it loosens.
2. Pull the top half upwards.
3. Lift up the battery compartment cover.
4. Slide the battery in.
5. Insert the plastic plug into the slot.
6. Press to turn the projector ON.
NOTE Make sure it is fully charged before first use.
NOTE When opening or closing the ball you will hear a
click signifying that it has opened or closed. Do not
keep
1
2
3
4
5
6
twisting beyond the click noise or you may break the unit.
NOTE appears with the projected time when the
projection unit batteries are low.
To charge the projection unit, place it on the main unit,
making sure that 1 of its 3 base circles is in contact with
the main unit, charging pad.
Charge the projection unit for 12 hours the first time and
8 hours from then on. This will provide the projection
unit with 10 hours continuous projection time.
is animated during charging and static when full.
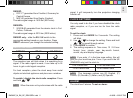
CLOCK DISPLAY MODES
Press MODE to toggle between the clock displays:
•
Clock with seconds
•
Clock with weekday
•
Clock with time zone offset and weekday
NOTE The light sensor at the back of the clock will
detect the light level in the room and adjust the clock
display accordingly. Do not position the back of the
clock close to a wall or other object, otherwise the light
may not function.
CLOCK RECEPTION
This product is designed to synchronize its calendar
clock automatically once it is brought within range of
a radio signal:
RM382P_M_EN_OP_REVISED1.indd 4 4/19/06 6:03:31 PM