


27
Reference Manual
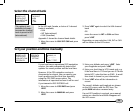
Edit or delete a channel name
The channel banks are listed in Appendix C
with their default names. You can edit the
individual channel names or delete them.
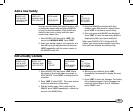
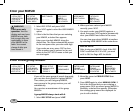
1. Scroll through the radio menu until RADIO
SETUP is displayed.
2. Move the cursor to RADIO SETUP and press
>ENT.
3. Press >ENT again to select CH NAME.
4. Use ^CH/SELv to select the channel and
display the associated name tag, then press
>ENT.
The LCD screen shows the existing channel
name and invites you to edit or delete it.
5. Press >ENT to edit the channel name and
then enter the new name over the existing
name. It can be a maximum of 12 characters.
(In this example, TELEPHONE is changed to
PHONE AAAA.)
OR
move the cursor to DELETE and then press
>ENT to delete the existing name. In this
case, no name will be displayed on the LCD
screen when the channel is operational.
6. Press >ENT again to confi rm the new
channel name or deletion.
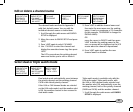
USA/INT/CAN
GPS/DATA
DSC SETUP
>RADIO SETUP
TELEPHONE
>EDIT
DELETE
RADIO SETUP
>CH NAME
WATCH MODE
WX ALERT
CH NAME
TELEPHONE
EDIT CH NAME
TELEPHONE
EDIT CH NAME
PHONE AAAA
ENT>STORE
ESC>CANCEL
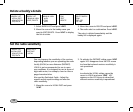
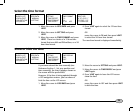
Select dual or triple watch mode
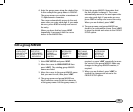
USA/INT/CAN
GPS/DATA
DSC SETUP
>RADIO SETUP
RADIO SETUP
CH NAME
>WATCH MODE
WX ALERT
WATCH MODE
>ONLY 16CH
16CH + 9CH
Dual watch mode automatically scans between
the priority channel and the working channel.
CH16 is the default priority channel.
If the USA or CAN channel banks are selected
on the USA radio model, and the weather alert
is ON, the weather channel is also scanned in
dual watch mode.
Triple watch mode is available only with the
USA radio model. Triple watch mode, with
the USA or CAN channel banks selected and
the weather alert ON, automatically scans the
working channel, both of the priority channels
(CH09 and CH16), and the weather channel.
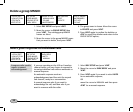
1. Scroll through the radio menu until RADIO
SETUP is displayed.