


–
15
–
E
N
D
V
D
F
U
NCTI
O
NS
ENTERENTERENTER
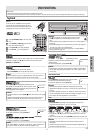
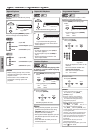
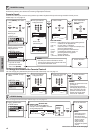
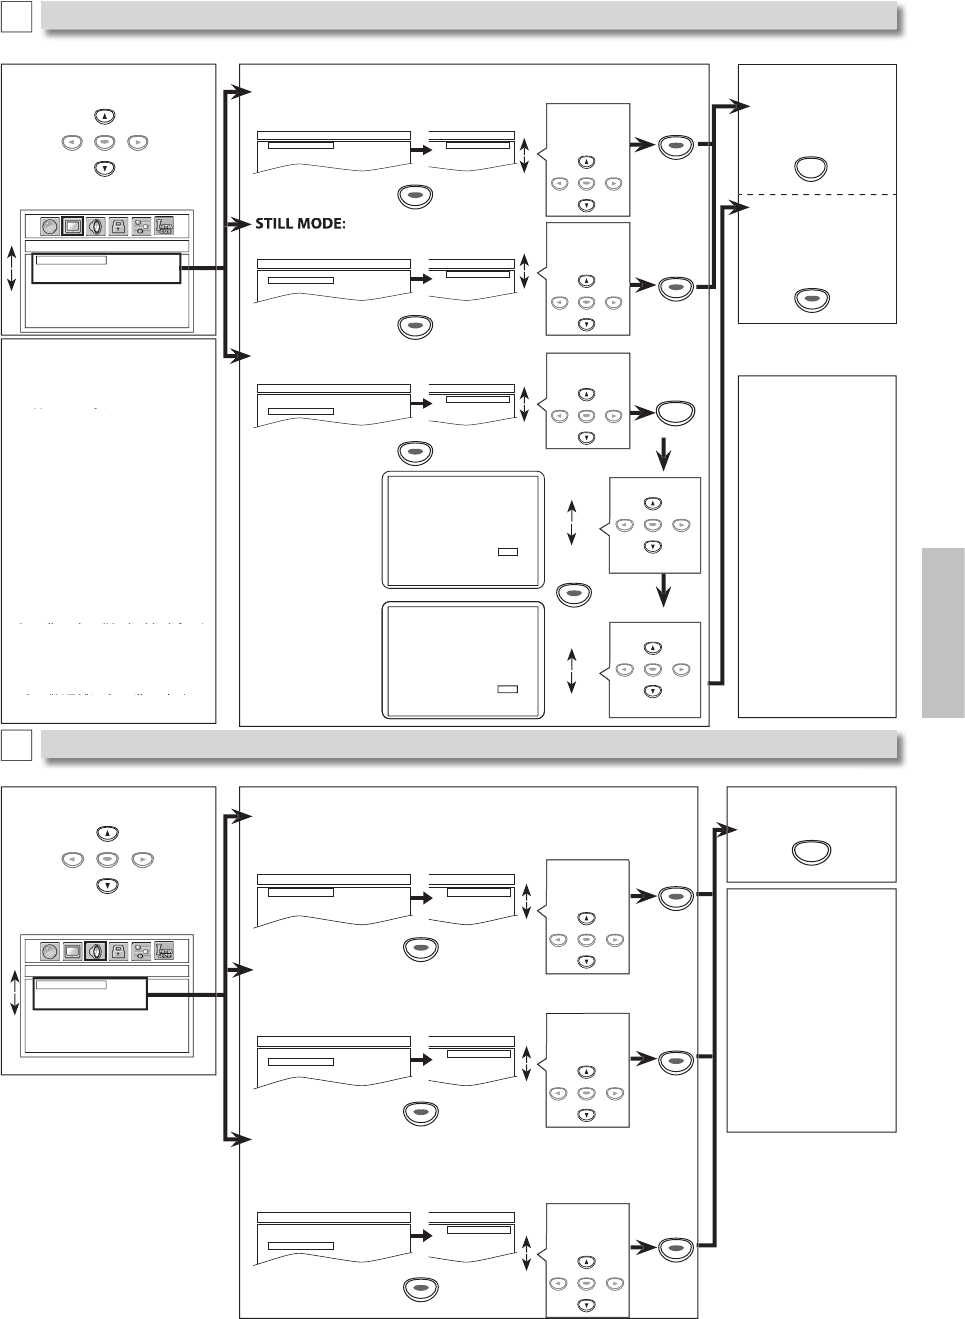
TV ASPECT: (De
f
ault: 4:3 LETTER BOX
)
See
n
ote
o
n
t
h
e
l
eft.
TV ASPECT
STILL MODE
PROGRESSIVE
4:3 LETTER BOX
4:3 PAN & SCAN
16:9 WIDE
DISPLAY_TV ASPECT
4:3 LETTER BOX
4:3 PAN & SCAN
16:9 WIDE
ENTERENTERENTER
ENTER
ENTER
ENTER
(
Default: AUTO)
See note on the left.
TV ASPECT
STILL MODE
PROGRESSIVE
AUTO
FIELD
FRAME
DISPLAY_STILL MODE
AUTO
FIELD
FRAME
ENTER
ENTER
ENTER
Select the
d
esire
d
setting
.
ENTER
ENTERENTERENTER
Se
l
ect t
h
e
d
esired
setting
.
ENTER
ENTERENTERENTER
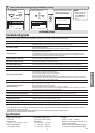
4
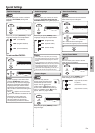
Select the desired setting
.
TV ASPECT
STILL MODE
PROGRESSIVE
OFF
ON
DISPLAY_PROGRESSIVE
OFF
ON
5
To exit
“
TV A
S
PE
C
T
”
or
“
S
TILL M
O
DE
”
m
e
n
u
To complete
“
PROGRESSIVE
”
settin
g
3
Se
l
ect t
h
e
d
esire
d
item
.
DISPLAY_TV ASPECT
TV ASPECT
STILL MODE
PROGRESSIVE
4:3 LETTER BOX
4:3 PAN & SCAN
16:9 WIDE
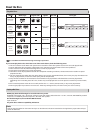
You can change the Displa
y
functions. Follow steps 1 to 2 on page 14.
DI
S
PLAY menu
SETUP
D
ISPLAY Settin
g
B
A
UDIO Sett
i
n
g
C
ENTER
4
Select the desired setting
.
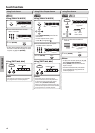
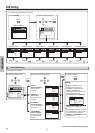
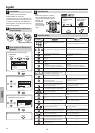
Choose the appropriate audio settings for your device. It only affects during the playback of DVD. Follow steps 1 to 2 on page 14.
h i di i f d i I l ff d i h l b k f DVD F ll
DRC (Dynamic Range Control): (Default: ON)
S
et to “ON” to compress the range between soft and loud sounds
.
Set to “OFF” to hear the original Dynamic Range soft and loud sounds.
DOLBY DIGITAL:
(
Default: BITSTREAM
)
Set to “BITSTREAM” when the unit is connected to a Dolby Digital decoder
.
• BITSTREAM: outputs Dolby Digital signals
.
• PCM: convert the Dolb
y
Digital into PCM (2 channel).
DRC
DOWN SAMPLING
DOLBY DIGITAL
ON
OFF
AUDIO_DRC
ON
OFF
DOWN SAMPLING: (Default: ON)
Set to “ON” when outputting in 48kHz
.
Set to “OFF” when outputting the original sound.
DRC
DOWN SAMPLING
DOLBY DIGITAL
BITSTREAM
PCM
AUDIO_DOLBY DIGITAL
BITSTREAM
PCM
DRC
DOWN SAMPLING
DOLBY DIGITAL
ON
OFF
AUDIO_DOWN SAMPLING
ON
OFF
ENTERENTERENTER
ENTERENTERENTER
ENTER
ENTER
ENTER
Se
l
ect
t
h
e
des
ir
ed
setting
.
ENTER
Se
l
ect
t
h
e
des
ir
ed
setting
.
ENTER
Select the
d
esire
d
setting
.
ENTER
ENTERENTER
ENTERENTER
ENTERENTERENTER
3
Se
l
ect t
h
e
d
esire
d
item
.
AUDIO_DRC
DRC
DOWN SAMPLING
DOLBY DIGITAL
ON
OFF
AUDIO men
u
Note
s:
D
R
C
:
•
This
f
unction is
avai
l
a
bl
e on
l
y on
d
iscs
wh
ic
h
are recor
d
e
d
i
n t
h
e Do
lb
y Digita
l
f
ormat.
DO
WN
S
AMPLING:
•
W
h
en p
l
aying
b
ac
k
d
iscs with copyright
p
rotection, the sound
w
i
ll
b
e
d
own samp
l
e
d
at 48kHz, even if you
s
et to “OFF”.
5
T
o exit t
h
e men
u
SETUP
ENTER
N
otes
:
TV A
S
PE
C
T
:
•
Se
l
ect “4:3 LETTER BOX”, so t
h
at
black bars may appear on the top
and bottom of the screen.
y
y
•
Select “4:3 PAN & SCAN” for a full
h
eig
h
t picture wit
h
b
ot
h
si
d
es
adjusted.
•
Se
l
ect
“1
6:
9 WIDE” if
a
wi
de
-
sc
r
ee
n
TV i
s
co
nn
ected
to
t
hi
s
u
ni
t.
S
TILL M
O
DE
:
•
Se
l
ect “AUTO” usua
ll
y
.
•
If you select “AUTO”, it automatically
selects the best resolution setting
y
y
(“FRAME” or “FIELD”) based on the data
c
haracteristics of the
p
ictures. (default
)
•
If you select “FIELD”, the picture in
the still mode will be stabilized.
y
y
•
If
y
ou select “FRAME”, the picture in
the still mode will be highly defined.
y
y
•
An individual picture on TV screen
is called a “frame”, which consists o
f
two separate ima
g
es called as “field”
.
•
Some pictures may be blurred if you
select “AUTO” in the still mode due
yy
y
to t
h
eir
d
ata c
h
aracteristics
.
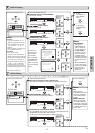
P
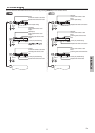
ROGRESSIVE:
(
Default: OFF)
S
ee note on the right
.
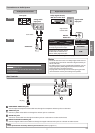
Before proceeding…
1. Make sure your TV has progressive scan.
2. Connect with component video cable
NOTE: If there is no picture or picture is
distorted after selecting ‘YES’,
wait about 15 seconds for auto recovery.
Activate Progressive?
SELECT: K / L SET:ENTER
NO
YES
NO
YES
NO
YES
Confirm again to use progressive scan.
If Picture is good, select ‘YES’.
SELECT: K / L
SET:ENTER
I
f there is no
p
icture or you
do not press
any buttons
f
or 15 seconds
,
“
PR
O
GRE
SS
IVE”
will
s
wi
tc
h
to
“
OFF” an
d
it wi
ll
exit t
h
e “SETUP”
men
u.
N
otes
:
PR
O
GRE
SS
IV
E
:
•
Y
ou can set
“
PROGRESSIVE
”
to
“OFF” in “DISPLAY”
menu or press an
d
h
o
ld
[
B
(
PLAY
)
]
on the front of the
unit for more than
5 secon
d
s
d
uring
p
l
ay
b
ac
k
, so t
h
at t
h
e
P- SCAN in
d
icator on
the
f
ront panel turns
Off
.
•
When “PROGRESSIVE”
is “ON”, video signals
from the unit’s VIDEO
OUT jack will be
d
istorte
d
or not
b
e
out
p
ut at all
.
Select “Yes”
.
ENTER
Se
l
ect
“Y
es
”
.
ENTER
SETUP
S
elect
“ON”
.
ENTER
ENTERENTERENTER
I
nstructions continue on t
h
e next page.