


12
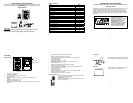
The Bonus Receiver use 2 x AA, IEC LR6, 1.5V
batteries. When the batteries need to be replaced, the
low battery symbol will appear on the LCD.
To install and replace the batteries, please follow the
steps below:
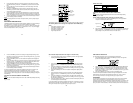
1. Remove the battery compartment cover.
2. Insert the batteries observing the correct polarity
(see the marking in the battery compartment).
3. Replace the battery cover.
BATTERY CHANGE:
It is recommended to replace the batteries in all units every 24 months to ensure
optimum accuracy of these units.
Please participate in the preservation of the environment. Return
used batteries to an authorized depot.
Note:
The stored History record will not be kept after the battery change is done on the
Weather Center.
IMPORTANT:
When a battery change is required on any of the units of this set, ALL units
have to be reset and user must go through initial set-up steps again. See
“Setting up” above.
13
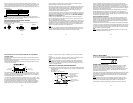
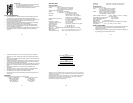
FUNCTION KEYS:
Weather Center:
The Weather Center has 5 easy-to-use function keys.
SET key
• Press to enter manual setting modes: LCD contrast, Manual time setting, 12/24
hour time display, Calendar setting, ºF/ºC temperature unit, Wind speed unit,
Rainfall unit, Pressure unit, Relative pressure reference setting, Weather
Tendency Sensitivity Value setting, Storm warning sensitivity setting and Storm
Alarm On/Off setting
• In normal display mode, press and hold to switch on/off the Buzzer
• In the weather alarm setting mode, press and hold to adjust different alarm
value and switch the alarm On/Off
• Press to activate the reset mode when max or min record is shown
• Stop the alarm during the time alarm or weather alarm ringing
+ key
• Press to change the calendar display to the preset alarm time, date, weekday +
date or seconds in the time display
MIN/MAX key
Set key
+ key
HISTORY key
ALARM key
14
• Press to adjust (increase) the level of different settings
• Stop the alarm during the time alarm or weather alarm ringing
• Press to confirm to reset the max/min record
HISTORY key
• Press to display the weather data history records
• Stop the alarm during the time alarm or weather alarm ringing
• Press to exit manual setting mode and alarm setting mode
ALARM key
• Press to enter the time alarm and weather alarm setting mode
• Confirm particular alarm setting
• Press to exit the manual setting mode
• Stop the alarm during the time alarm or weather alarm ringing
• Press to exit max/ min record display mode
MIN/MAX key
• Press to display minimum and maximum records of various weather data
• Press to adjust (decrease) the level of different settings
• Stop the alarm during the time alarm or weather alarm ringing
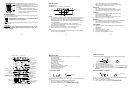
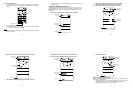
LCD SCREEN
The LCD screen is split into 5 sections displaying the following information:
1. Time and date
2. Wind data
3. Outdoor temperature and humidity,
4. Air pressure and Rainfall data
5. Air pressure history and Weather forecast.
15
Air pressure
histogram
Outdoor temperature
in °F or ºC
Wind direction display
and wind speed in
Beaufort scale
Calendar display
Weather tendency
indicator
Time display
Time alarm icon
Outdoor relative
humidity in %
Weather forecast icon
Relative air pressure
display in inHg or hPa
Wind speed in mph,
km/h or m/s
Wind Chill in F or
Wind speed Hi/ Lo
alarm icon
Outdoor Humidity
alarm icon
Outdoor temp.
alarm icon
Total rainfall in
inch or mm
Low battery indicator
Transmitter signal
rece
p
tion icon
Transmitter low battery indicator
Buzzer off indicator
16
TX
MANUAL SETTING:
The following manual settings can be changed once the SET key is pressed:
• LCD contrast setting
• Manual time setting
• 12/24 hour time display
• Calendar setting
• °F/ °C temperature unit setting
• Wind speed unit
• Rainfall unit setting
• Air pressure unit setting
• Relative pressure reference value setting
• Weather Tendency Sensitivity value
• Storm warning threshold value
• Alarm On/ Off setting
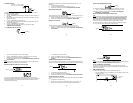
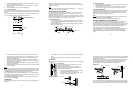
LCD CONTRAST SETTING
The LCD contrast can be set within 8 levels, from "LCD 1" to "LCD8" (default setting is
LCD 5):
1. Press the SET key, the contrast level digit will start flashing.
2. Use the + or MIN/MAX key to adjust the level of contrast.
3. Confirm with the SET key and enter the MANUAL TIME SETTING.
Digit flashing
17
MANUAL TIME SETTING:
You then may manually set the time of the clock by following the steps below:
1. The hour digit will start flashing.
2. Use the + or MIN/MAX key to set the hour.
3. Press the SET key to switch to the minutes. The minute digit will start flashing.
4. Use the + or MIN/MAX key to set the minute.
5. Confirm the time with the SET key and enter the 12/24 HOUR TIME DISPLAY
SETTING.
12/24 HOUR TIME DISPLAY SETTING:
The time can be set to view as 12-hour or 24-hour format. The default time display
mode is 12-h. To set to 24-h time display:
1. Use the + or MIN/MAX key to toggle the value.
2. Confirm with the SET key and enter the CALENDAR SETTING.
Minutes flashing
Hour
flashing
Digit flashing