7
Disconnecting the Docking Station
If you move your notebook out of range, the dock will become
disconnected. If you selected “automatically reconnect” during the
association step, the connection will return automatically once you are
again within range.
Note: If the Docking Station is transferring data through one of its USB
connections, wait until the data has finished transferring. If you are
using a USB flash drive, we recommend that you use the Windows Safely
RemoveHardwarefeaturebeforedisconnectingtheashdrive.
When the dock is disconnected, the external monitor connected to the
docking station goes blank.
Note: If the video output of the Docking Station is configured in Extended
(dualview) mode (see “Video Modes,” below), then any open windows on
the external monitor move to the primary notebook screen. When the
Docking Station is reconnected to the notebook, the video output is again
configured for Extended (dualview) mode with the external monitor.
However,windowsthatwerepreviouslyontheexternalmonitordonot
move back to that secondary monitor.
Video Modes
The Docking Station video output works in two modes:
• Extended(dualview)
• Clone
By default, the Docking Station uses video output in Extended (dualview)
mode.
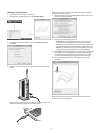
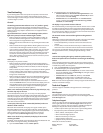
Extended (dualview) Mode
Extended (dualview) mode lets you split your display across the laptop
screen and the connected monitor.
In this mode you can drag and drop windows from one screen to the
other. This provides a number of advantages to increase productivity:
• Reademailononedisplay;openattachmentsontheother.
• Expandaspreadsheetacrossbothmonitors.
• Forgraphicsediting,increaseyourworkingareabyputtingallthe
pallets and toolbars on the second display.
• KeepyourdesktopontheexternalmonitorandwatchaDVDonyour
notebook screen.
When your Docking Station is in Extended (dualview) mode, the Extended
(dualview) mode display indicator glows green.
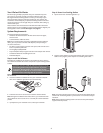
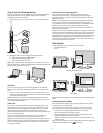
Step 4: Use Your Docking Station
You may connect devices to the appropriate port on the Docking Station
while your notebook is running. A slight delay is normal before the
notebook recognizes the new device.
1 Plug device cables—mice, monitor, and so on—into docking station.
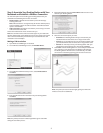
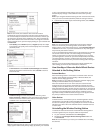
2 (Optional) If monitor is connected, adjust display settings:
a Right-click Kensington icon in taskbar.
b Select Extended (dualView) or Clone.
c Select desired screen resolution.
Note: When you position your Docking Station, the wireless connection
works best if there is a clear line of sight between the Docking Station and
your notebook, with no obstructions.
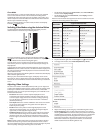
USB Ports
Connect any USB device to any of the Docking Station’s five USB ports.
Each port has a connection indicator light that shows the status of that
port:
• Whennodeviceisconnectedtotheport,theindicatorlightisoff.
• Ifadeviceisconnectedtotheportandtheconnectionworksproperly,
the indicator light glows green.
Note: If a USB device is connected to the Docking Station and does not
work as expected, test the device by connecting it directly to one of your
notebook’s available USB ports.
Video Port
Connect your monitor’s DVI cable to the DVI-I video output port on the
Docking Station and to an external monitor. If your monitor has a VGA
cable, plug the DVI-to-VGA adapter into the DVI output of the Docking
Station, then plug the VGA cable into the adapter. The cable can be
connected and disconnected any time without disconnecting the Docking
Station from your notebook.
You can adjust video settings to customize your use of the Docking
Station;see“AdjustingVideoSettings,”below,forinformation.
Note: We recommend that you auto-adjust the external monitor once in a
while to realign its settings with the video output of the Docking Station.
Refer to your monitor’s user manual for instructions on how to do the
auto-adjust procedure.
Extended Mode (dualview)
Clone Mode